Embedded=true

Looking through the latest tech talk video from our eminent product and fast track team I noticed Jason Green mentioning a new URL parameter for being able to fully embed Finance & Operations forms into Model driven PowerApps.

Add &embedded=true to your URL and see the top and left navigation bars completely disappear. Previously we’ve had the limited navigation option adding &limitednav=true that reduced the navigation capabilities, but still retaining the chrome of the app.

Jason mentioned that this is explicitly available for the linked environment (see video underneath to understand what that is), but you can open your app with this URL parameter for a very reduced look. This is GREAT for screens like the Production floor execution or any of the workspaces.

Here is the ODOP video. It is the most significant Dynamics 365 engineering roadmap talk I’ve seen in a very long time, so take time to view it all.

Release note highlights for Supply Chain Management

As a part of the Dynamics 365 2021 Release wave 1 there were some really cool features for Supply Chain Management. I’ve created three Podcast entries with automated reading if you want the details, but I’d thought a summary of the highlights would also be nice.

Dynamics 365 Supply Chain Management, 2021 Release wave 1 notes (1/3) – Dynamics Podcast
Dynamics 365 Supply Chain Management, 2021 Release wave 1 notes (2/3) – Dynamics Podcast
Dynamics 365 Supply Chain Management, 2021 Release wave 1 notes (3/3) – Dynamics Podcast

Product Information Management

This module get some improvements based on some left overs from the Engineering Change Management module. Now you can add processes and requirements to products before they are ready to be used. Either automated control of fields or check-lists and workflows for approval of items.

There will also be better functionality in sharing items across multiple legal entities.

Planning

The work on getting parity of Planning optimization service to the MRP functionality continues. This version sees a lot more functions added. There is still a way to go, but we’re getting there. Once this is in parity, I would believe that we’ll se some great new functionality added using ML and other connected data sources.

Inventory and Logistics

Landed cost is a functionality to better calculate and handle costs of complex and long running transport of inbound goods. The functionality will let you plan and execute processes regarding import of goods and really add the right cost to the items based on this activity.

A brand new Warehouse mobile app was announced to be available for preview in February 2021!

Rebate management will let users far better handle rebates and royalty processes.

Inventory visibility is a cloud service that let you expose inventory status from your solution along side aggregated information from your up or downstream supply chain in a hyper scalable web service. Great for scenarios where you want to expose inventory status to partners and customers in the supply chain without overloading your system.

Edge functionality through cloud and local scaling units for warehouse work processing gives a distributed architecture for this process to handle issues around unstable connections and latency.

Global inventory accounting add-in gives the opportunity to drive multiple costing models for inventory. Now you can use standard cost accounting for global supply chain status and FIFO for local accounting and regulatory support on the same product.

Manufacturing

New production floor terminal with a modern looking UI that also will support facial recognition of the users for identification!

The terminals will also be able to run in a distributed architecture both on on cloud and edge scaling units to handle issues like unstable connections and latency.

Asset management

It will be possible to bill customers for maintenance work soon.

There will be improvements to work planning with worker groupings and accumulated counter values are introduced.

Track asset health, state and usage through IoT connectivity.


These plans are continuously updated and many of the features are set to become GA (General availability) in April already. I’m expecting to see even more features being added to this list.

Take a listen to the three part Podcast series on this topic for the in depth overview and go to the roadmap site to get the full story.

Product Roadmap | Microsoft Dynamics 365

Copy into legal entity


Moving data from one company to another has been pretty taxing ever since we suddenly were faced with the missing “Duplicate” feature when first diving into Dynamics AX 2012.
For a while, we’ve been using the Data import export framework (DIEF) to export entities and import them back into other companies. That worked fairly good, but now with the Microsoft Dynamics 365 for Finance and Operations, Enterprise edition Platform update 11 we have a solution for copying directly between legal entities within a solution.
I tried the concept out on a very superficial setup as there are A LOT of parameters and entities to configure and stack in the right order. I haven’t been able to do a full implementation of it to test it out in a proper scenario, but at least the concepts are looking to be working.

It can be used for copying a company to another and starting with a fresh sheet as well as making a form of virtual data exchange. This solution can be set up to work both ways.

Here goes…


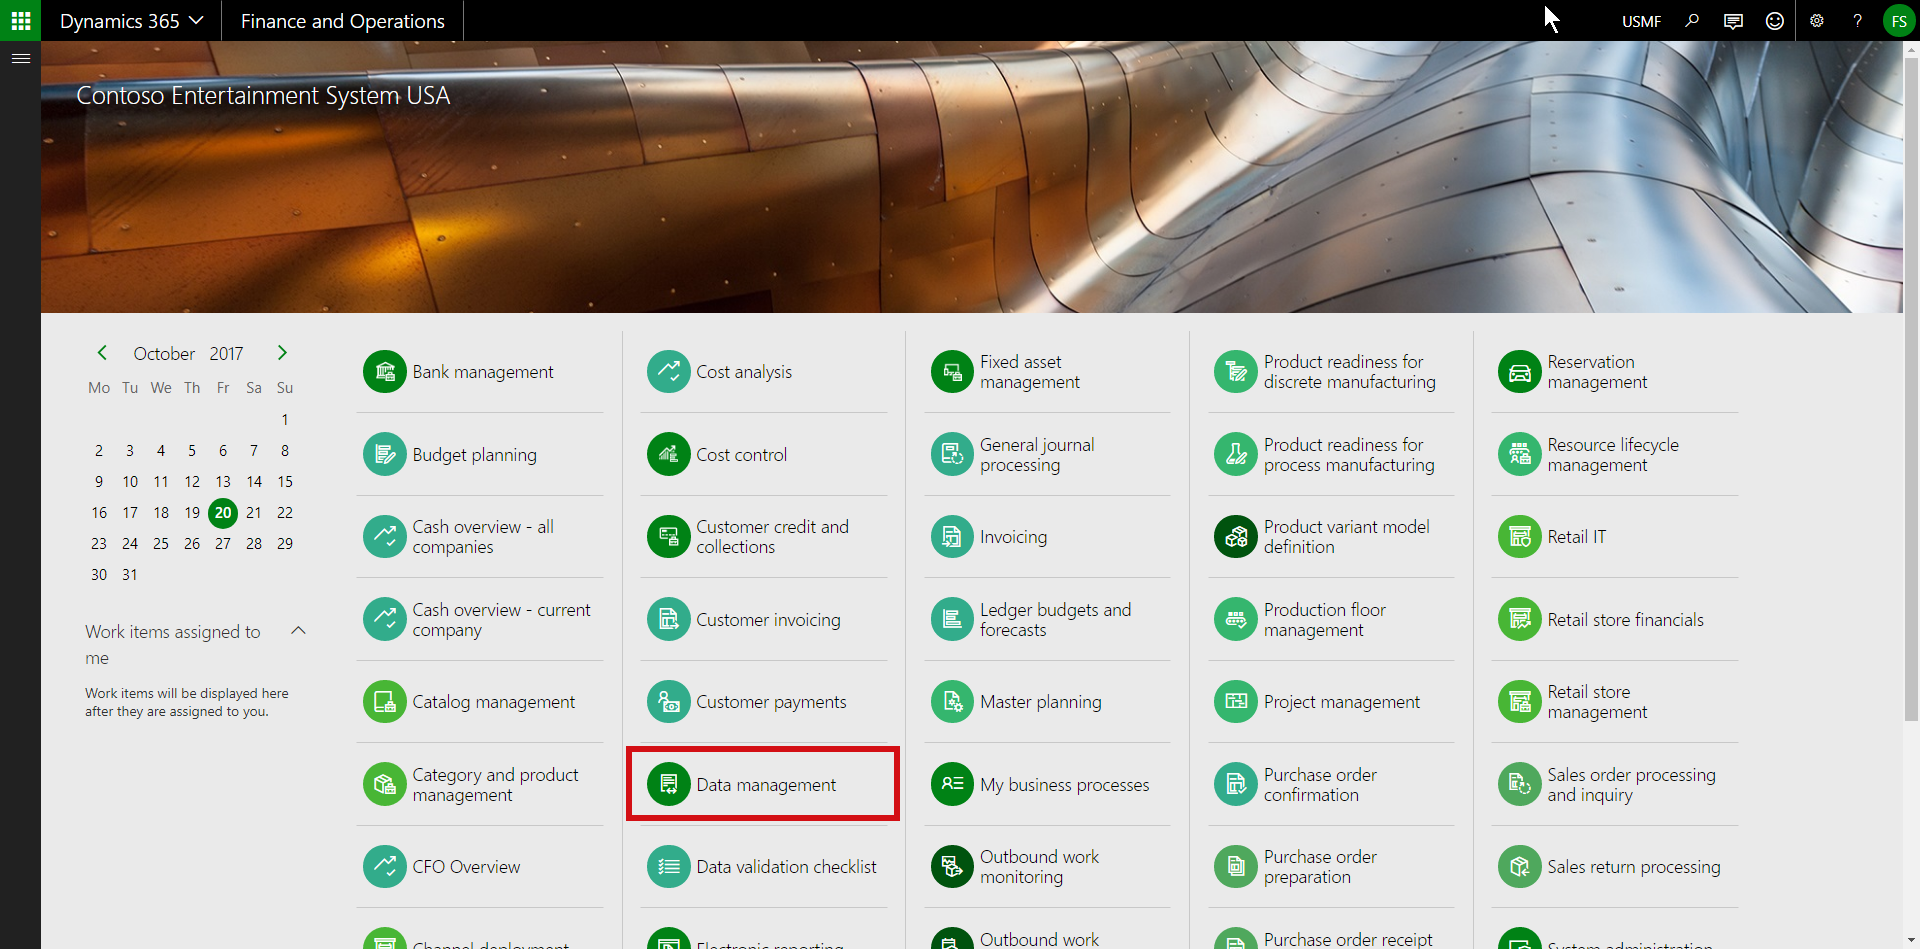
Go to the Data Management Workspace.
CLE01.png

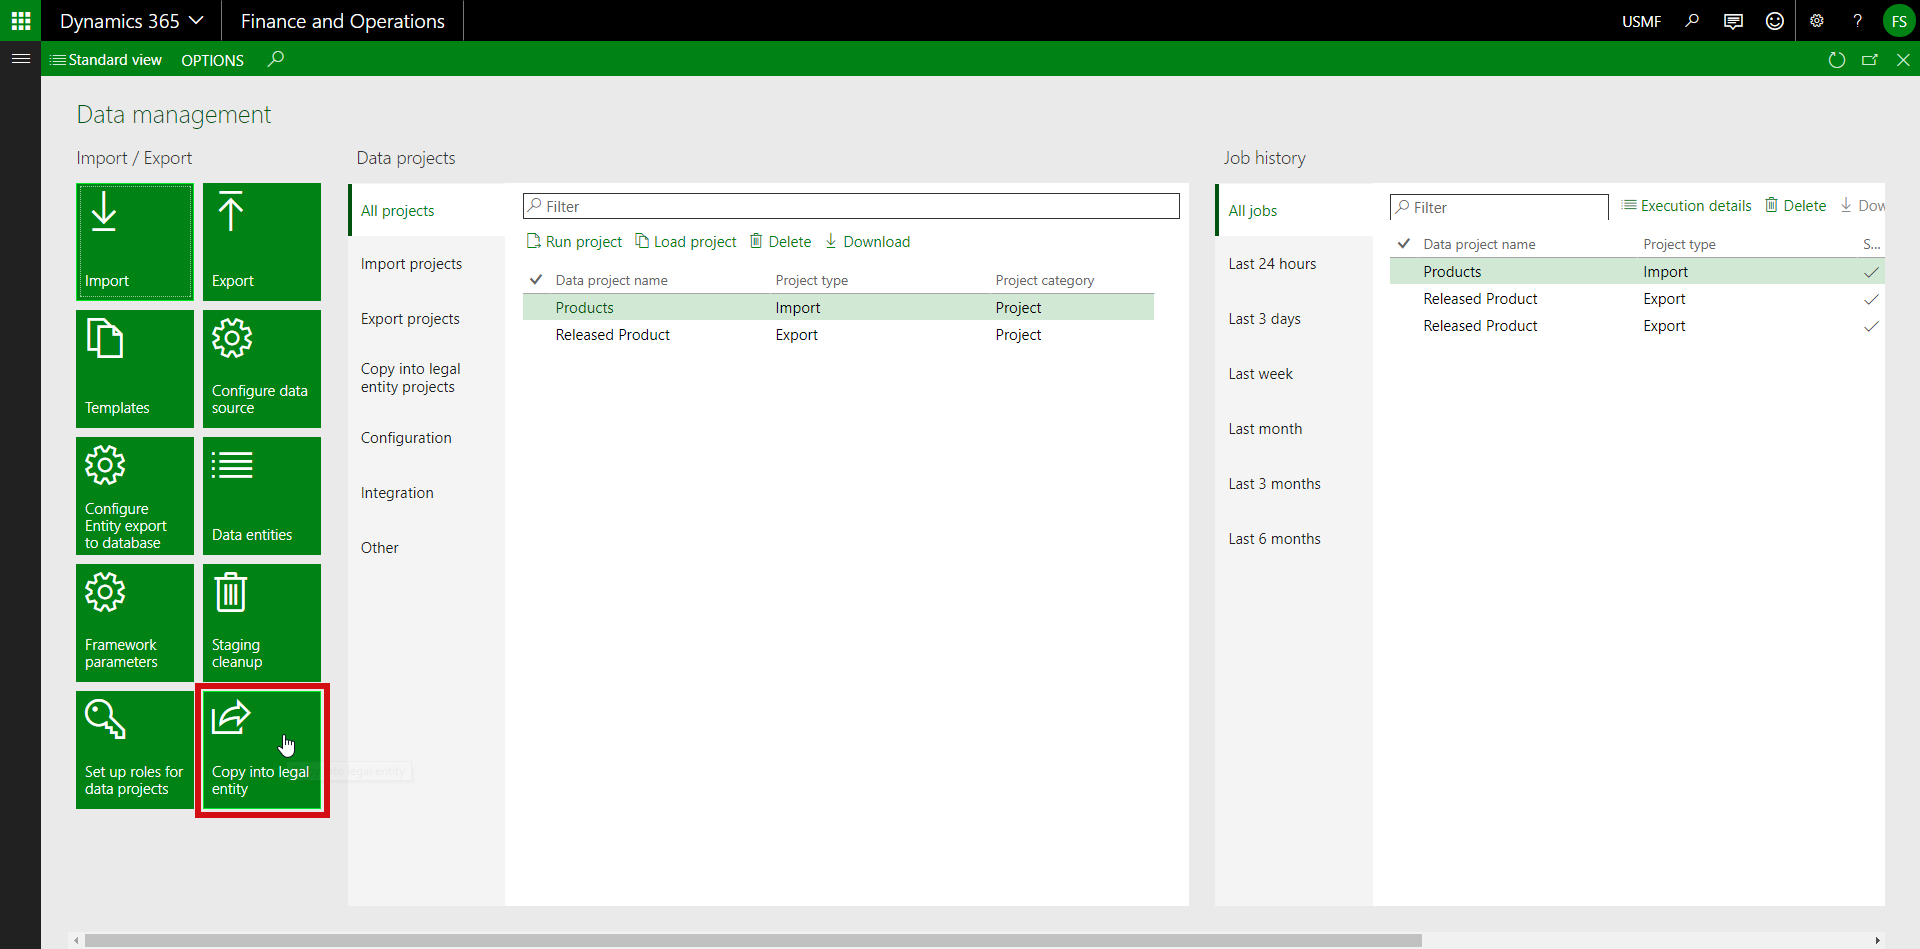
Select the “Copy into legal entity”.CLE02.png

Select a source legal entity and the target legal entities. Yes, you can copy to MULTIPLE companies from one legal entity.
CLE03

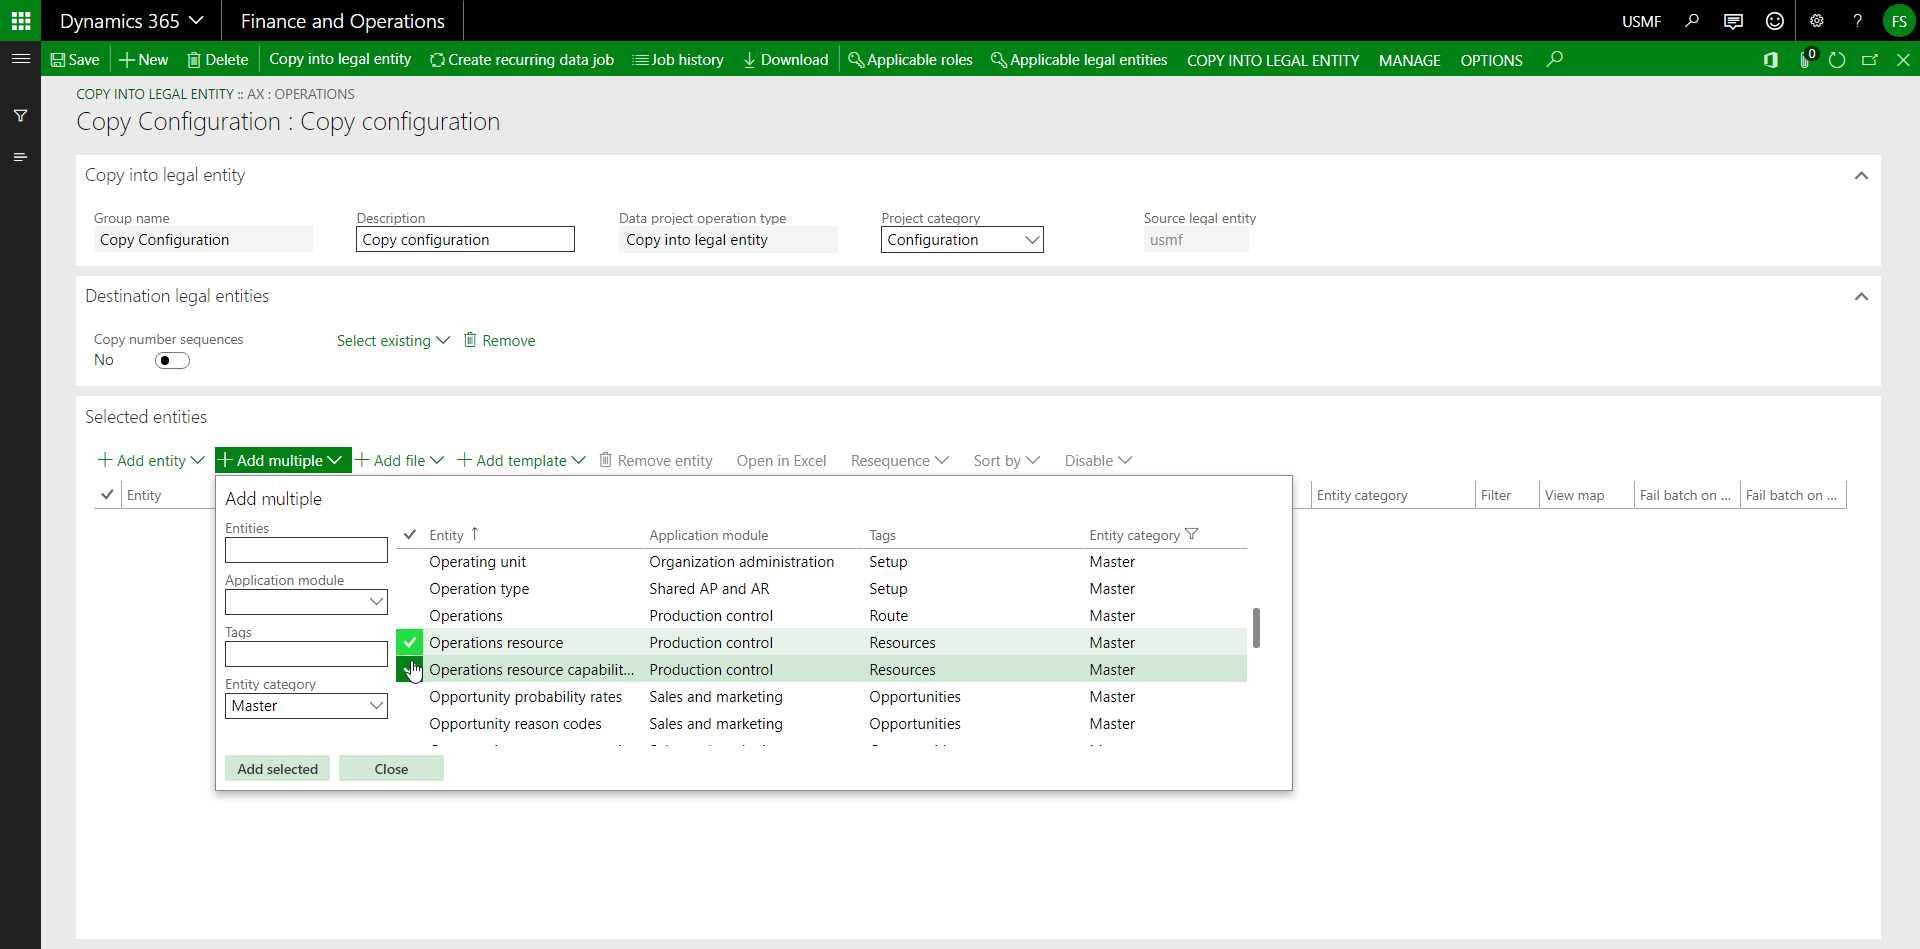
Add the desired entities either multiple or one by one.
CLE04.png

The big job is now to re-arrange the different entities so that the dependent ones are read in first. You can create Execution units and levels within these and then do a resequencing. I didn’t do that in this case and did run into some dependencies afterward, but it didn’t really matter for my exploration.

I would also guess that this will be things that can be copied in or templated, as there is a template option (maybe in LCS). There would probably be something that someone would make and share once it is first done.

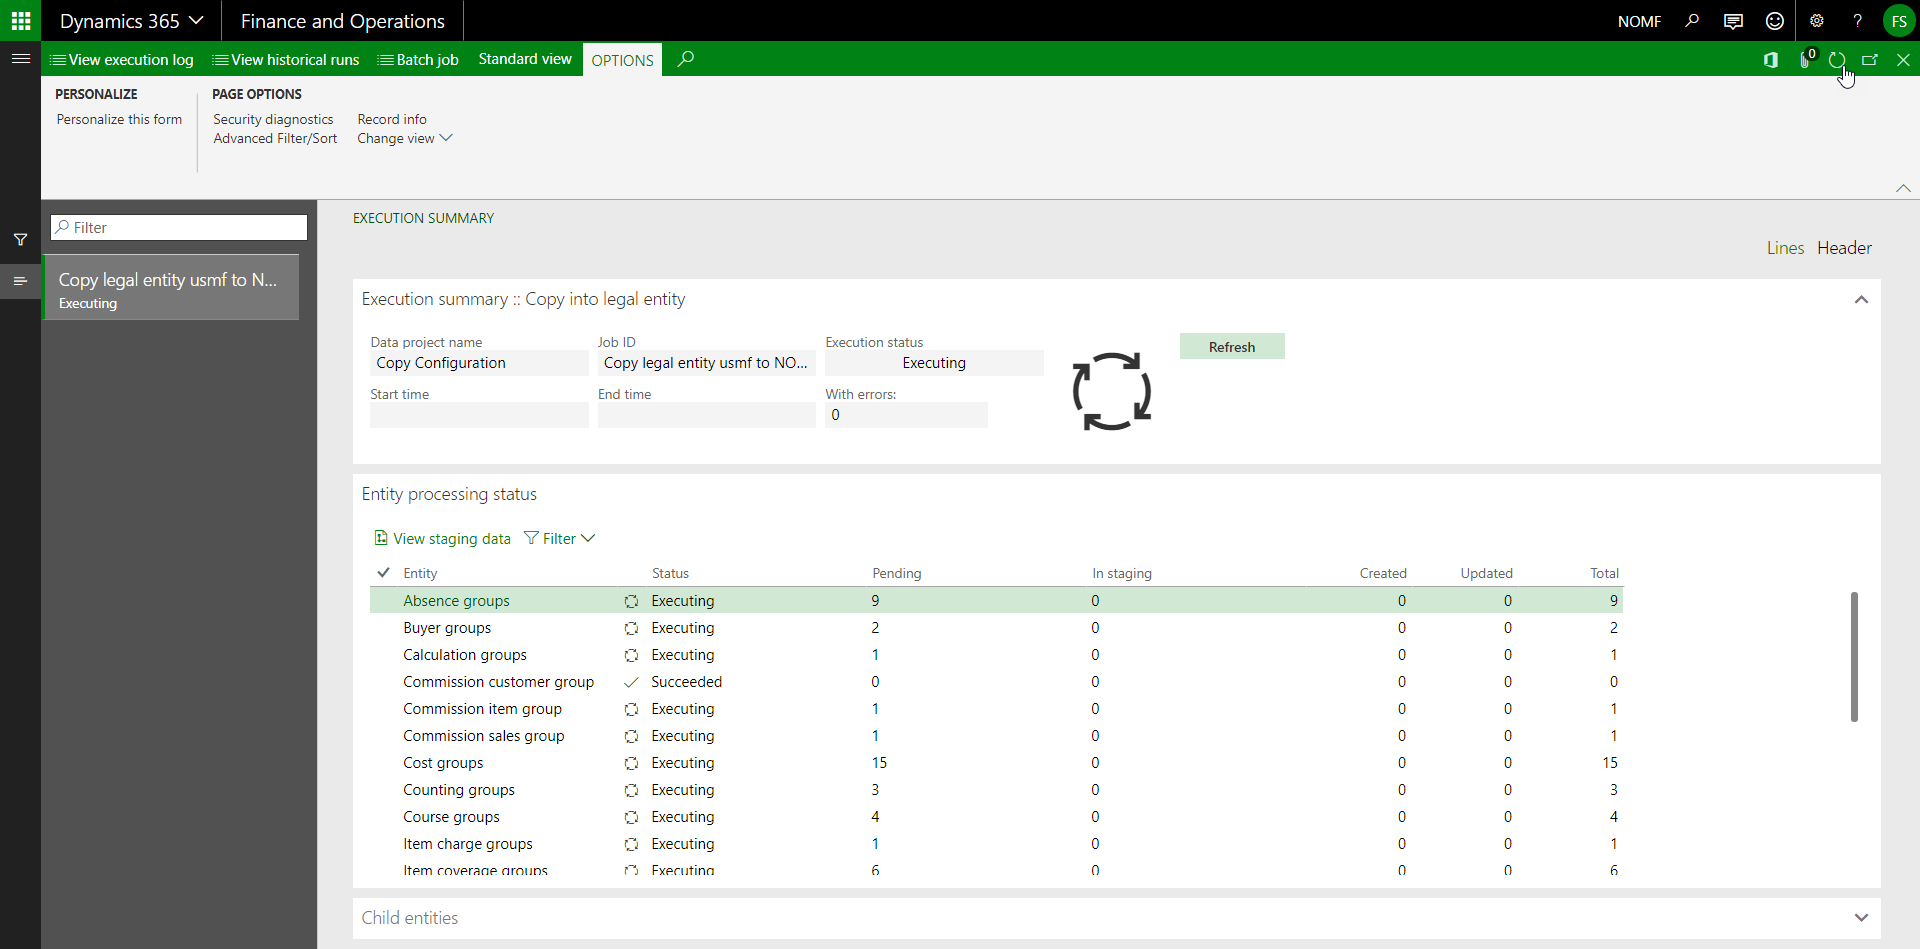
After this setup, I ran the import. CLE05.png

Once the form was refreshed a couple of times, it finished…
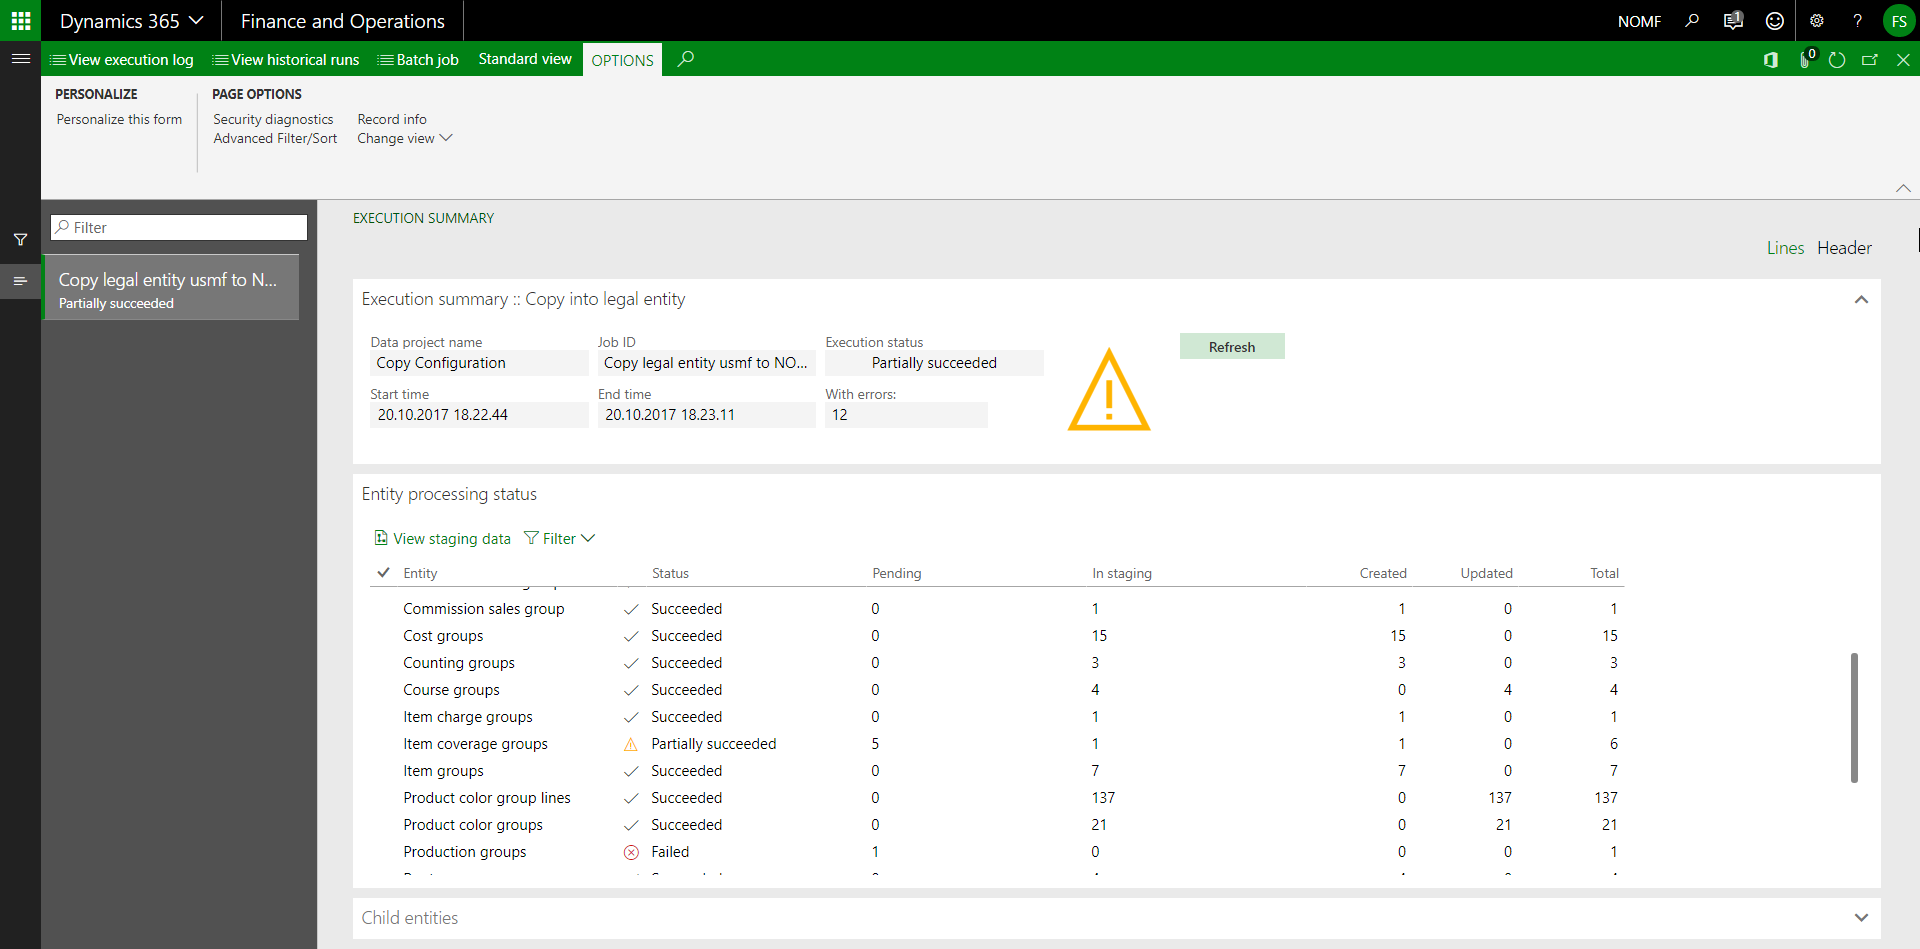
CLE06.png…with some errors and dependencies that were missing.
So I looked at the staging data and quickly found that I was missing an entity. I added it and ran it again.

CLE07.png

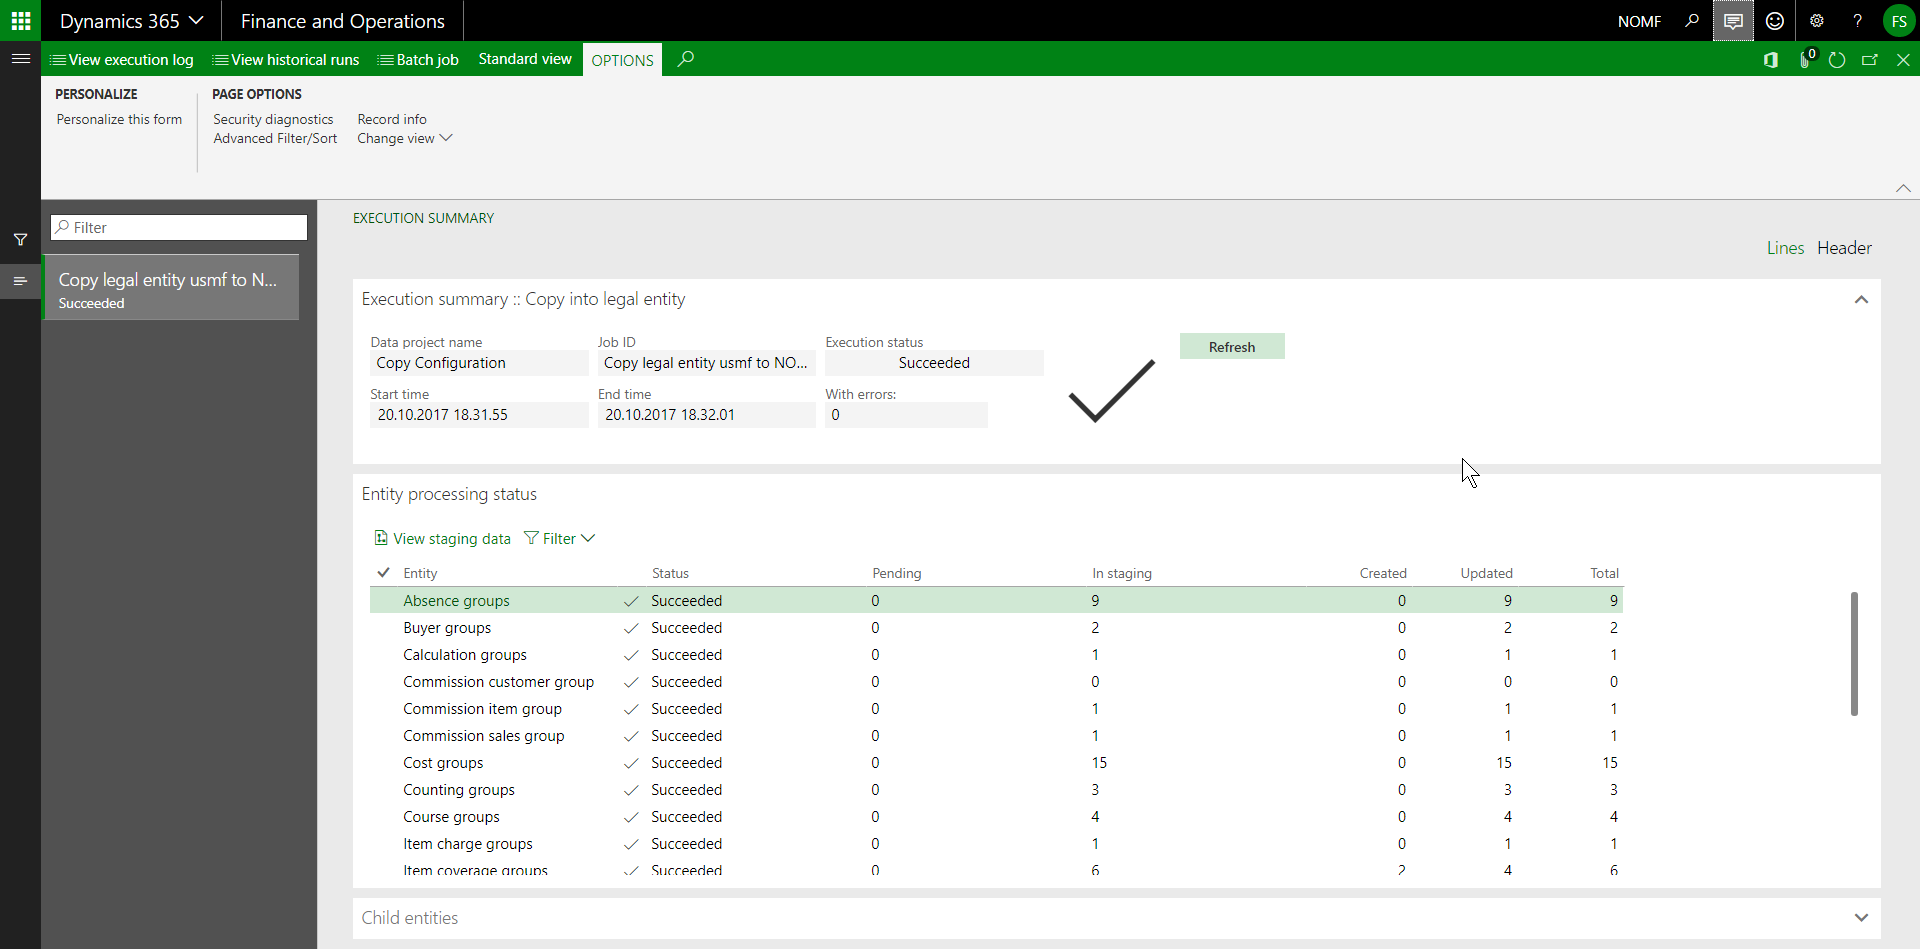
That did it. A successful copy of data from one legal entity DIRECTLY to another. Lovely!

New Business Processes feature

Making sure tasks are performed by the right person at the right time is always a hassle and we’ve got MANY places where one could organize these types of things and some are more convenient then others. I wrote about the Data Validation Checklist a few days ago and that gave us a great tooling when it comes to running through setup and effectively navigate and keep track of the process. The nice feature of that being that you could easily navigate to the task as you could associate a task with a menu item and get right to where you needed to be to perform the task.

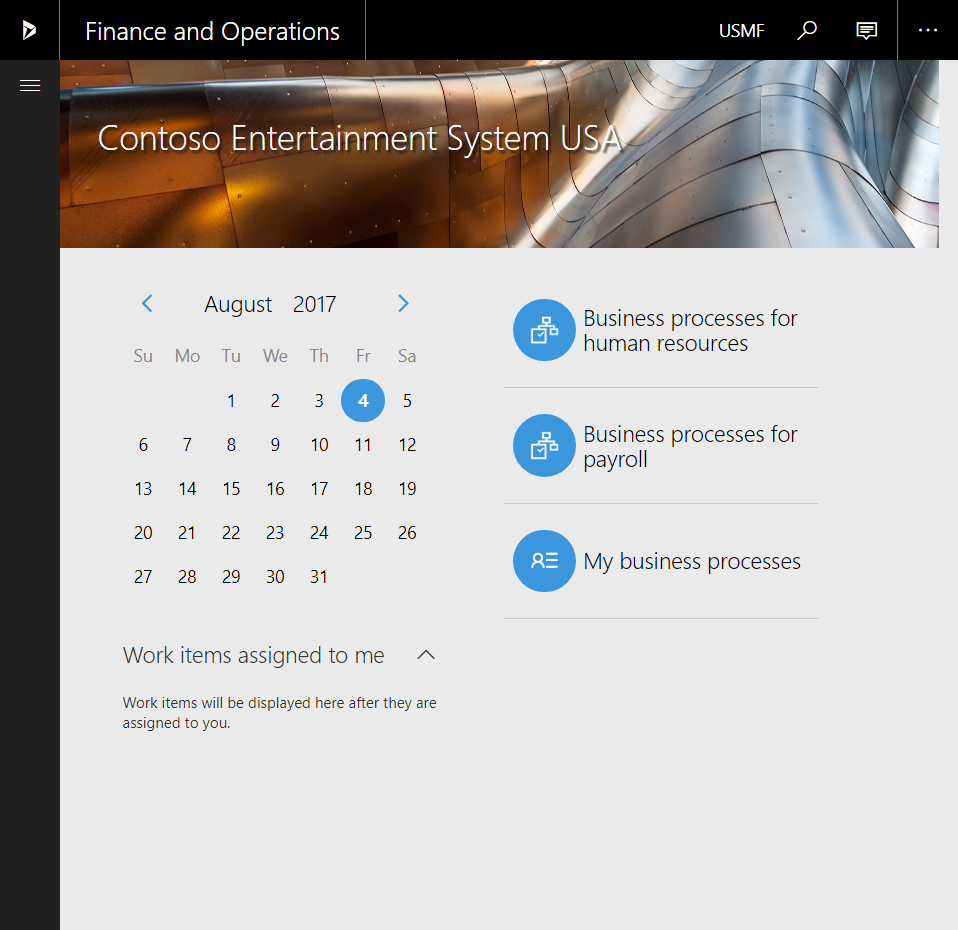
In the latest release of Dynamics 365 for Finance and Operations, Enterprise Edition we’ve also got a new “Business processes solution” from the HR product team which is pretty similar in nature, but has some extra features that you might like. It even got THREE work centers, which is rather superfluous and could be solved with only one with a filter function.
bp01.png

It is obviously meant to cover Payroll and HCM processes, but can basically be used for the same thing as the Data Validation Checklist (meaning all menu objects linked to a task can be reached). The difference being that it is not global in the solution when executing and tracking the tasks, but it is however have a personal user view and you can have a due date and offset deadlines on each tasks based on that. You are also able to execute the process multiple times.


Let us take a look at how this new feature works, how to set it up and then look at executing and tracking tasks.


Setting it up

1. Create a template

A template is a set of tasks that are to be triggered at a given time. Different tasks are then distributed based on the Assigned worker with a deadline offset to the target date.

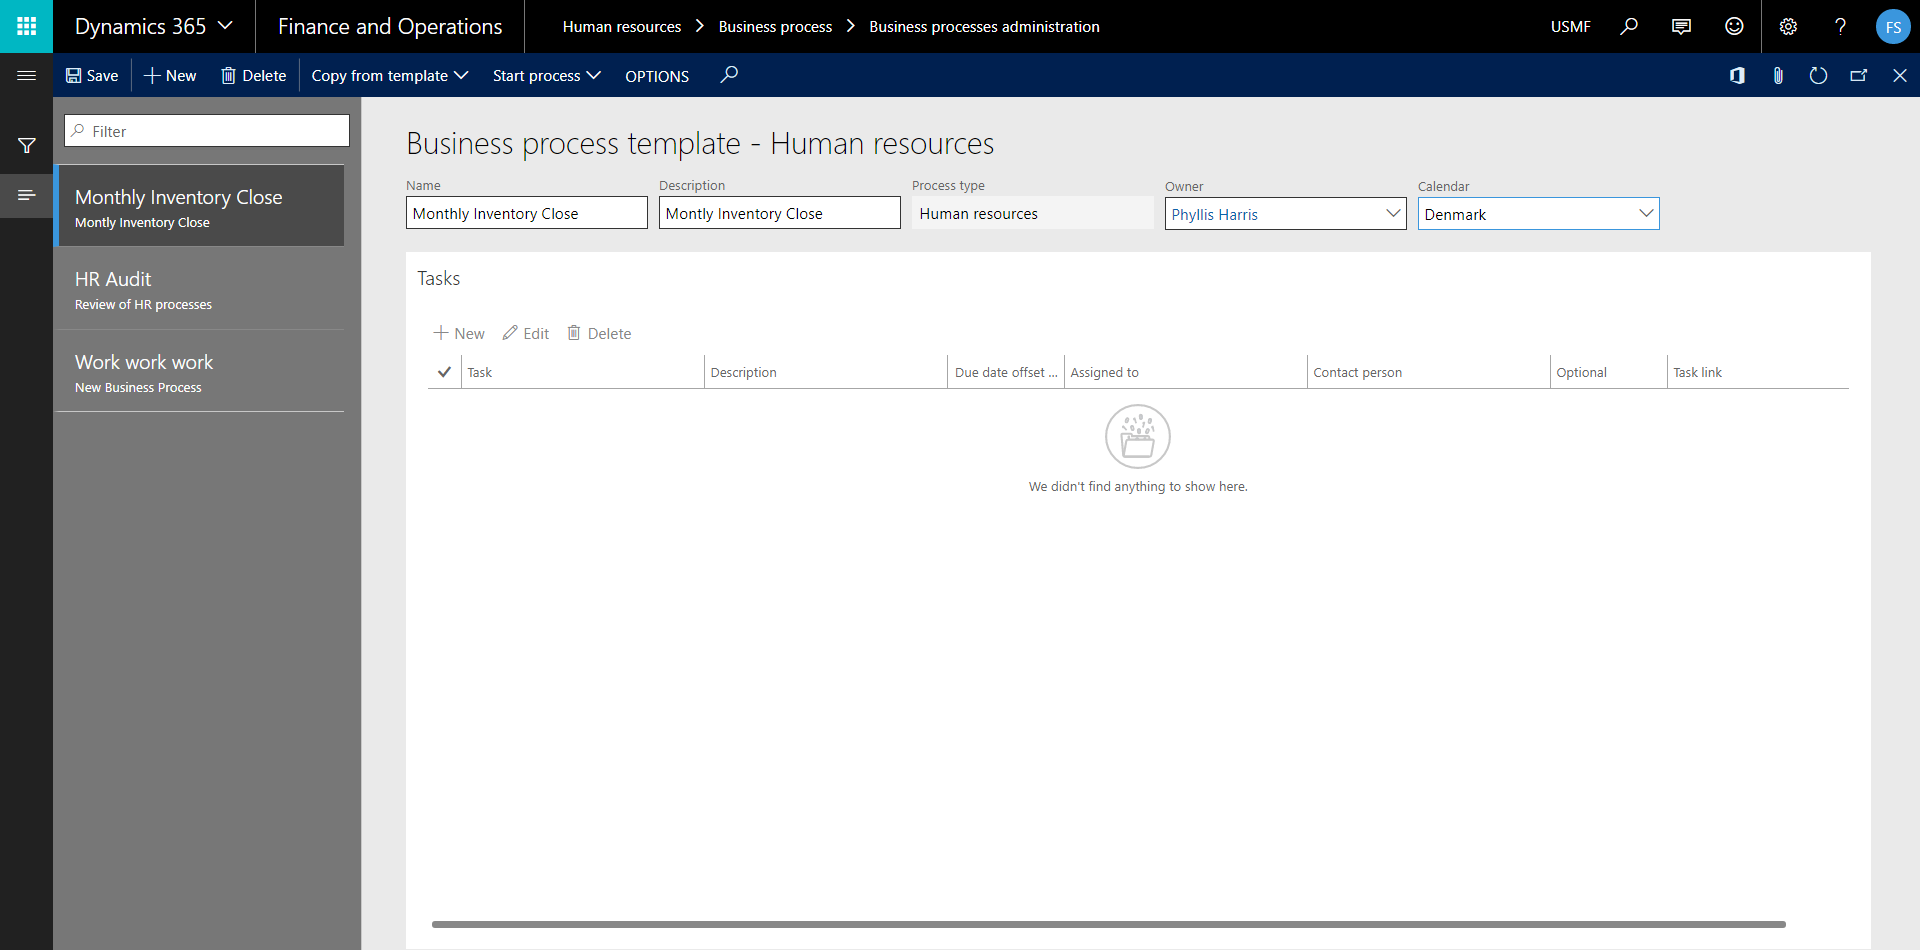
First you create a new task. I’m creating a “Montly inventory close” business process as an example. In the Contoso demo data there is an HR Audit.
BP03.png

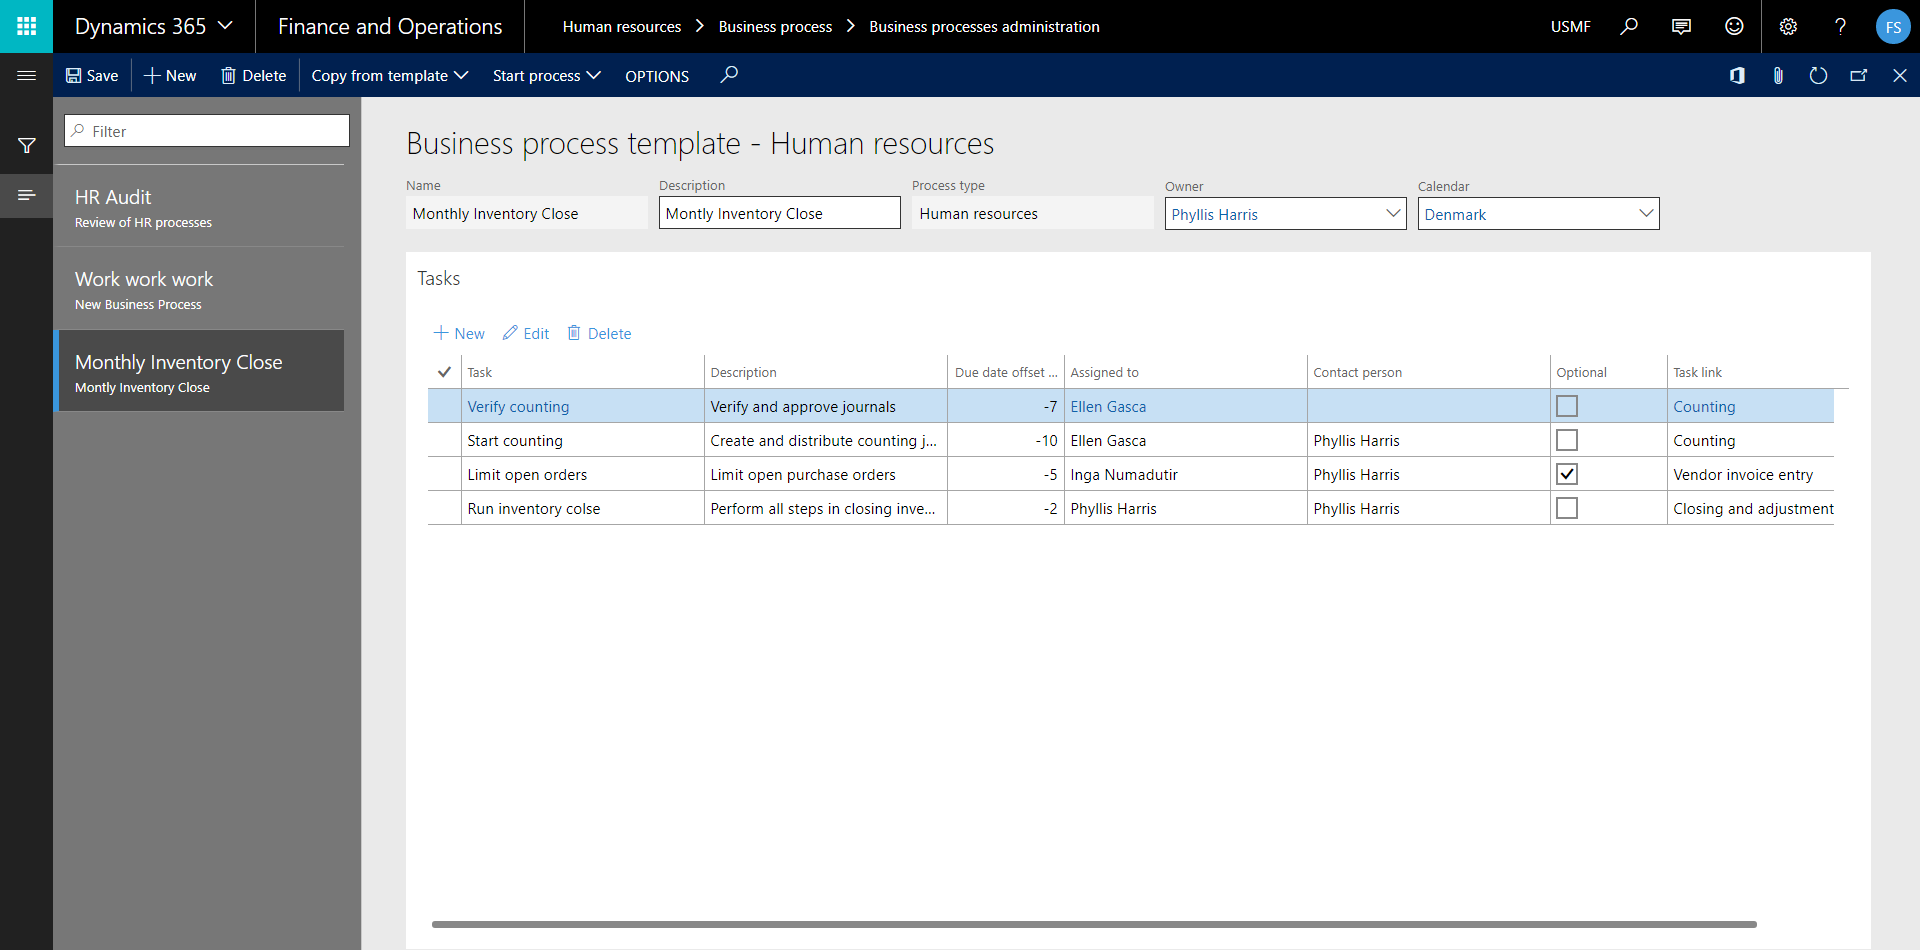
Input a name, description, template owner and calendar. The template owner will be able to create new tasks after the process has been triggered in addition to the existing template tasks. The calendar will help offset task deadlines and only focus on actual open business days.

The “Process type” is always set to the module you launch it from. I would assume that there will be other modules supported in the future.

2. Create tasks

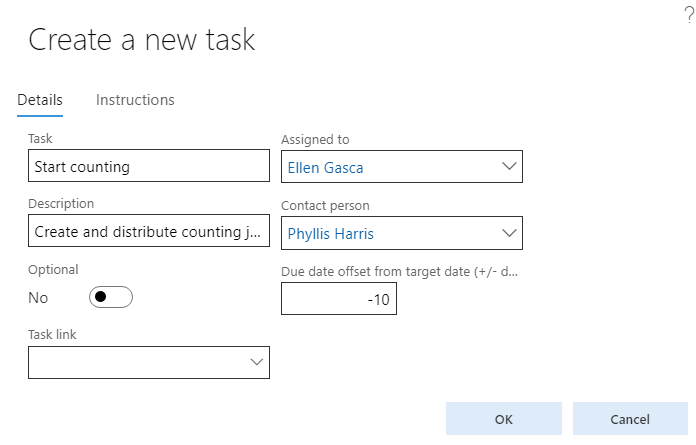
Once the template is saved you can create the tasks.
BP04-2

Create a name, description, Assigned worker, contact person, offset date and a task link. Note that a task can be optional.
BP05-2

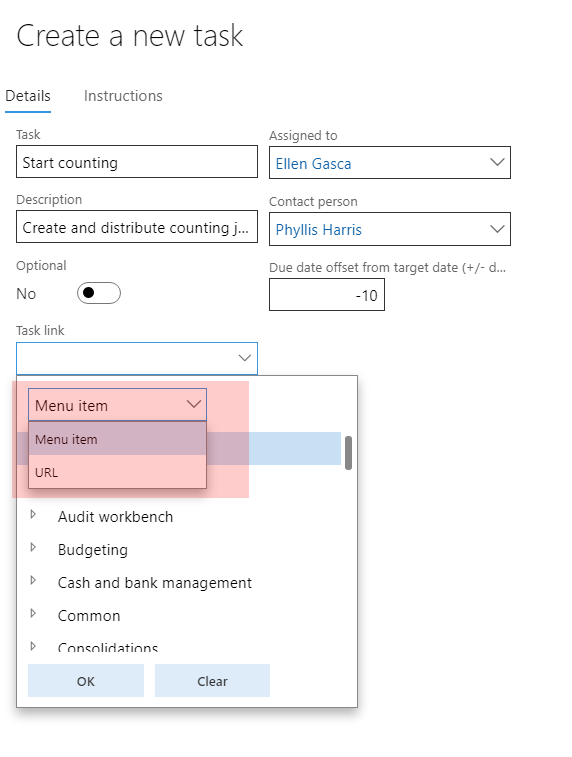
Task links can be either a menu item or a URL.
BP06

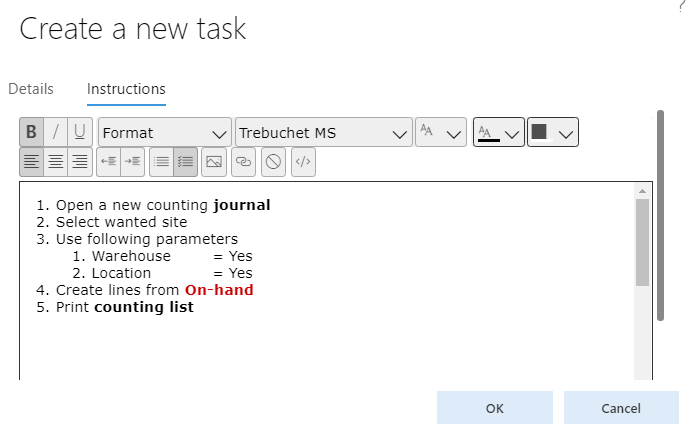
The instructions is a nice rich text editor that works very well.

Repeat the process until you have your complete business process.
BP07.png


Execution and tracking

Once a template is create it is then triggered for execution by clicking “Start Process” in the action menu.
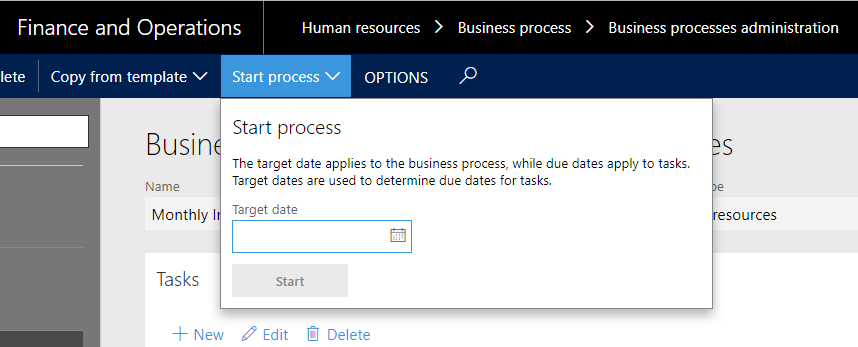
BP08.png

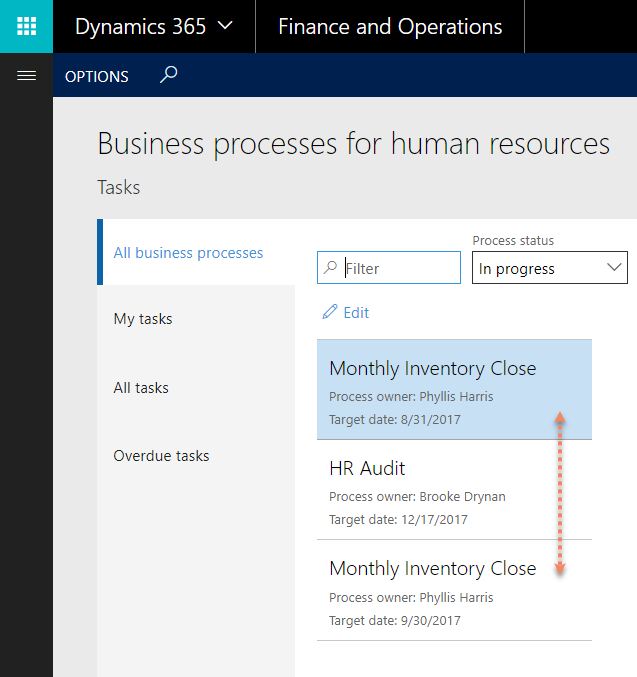
Once the process is started the system will create a business process instance with set of task for each task in the template. The status will be set to “in progress”. A Business process instance can have different statuses (“Not Started”, “In progress”, “Completed” and “Canceled”) and you can trigger multiple instances of templates and have them running at the same time.
BP12.png

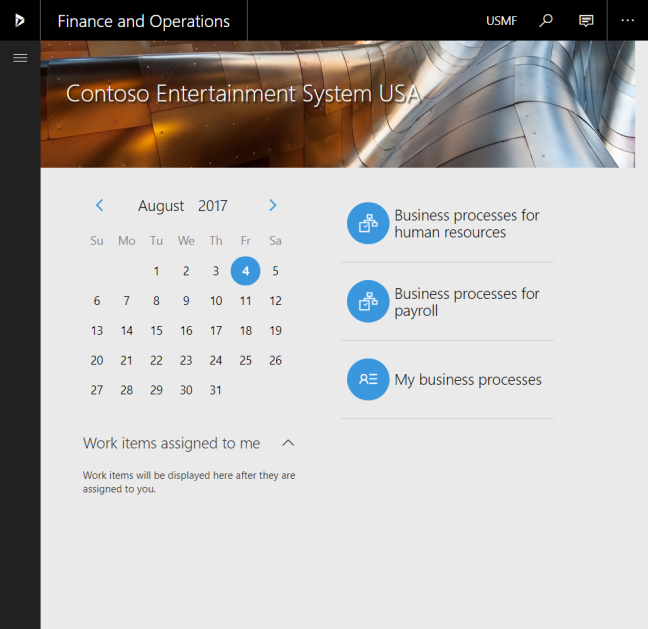
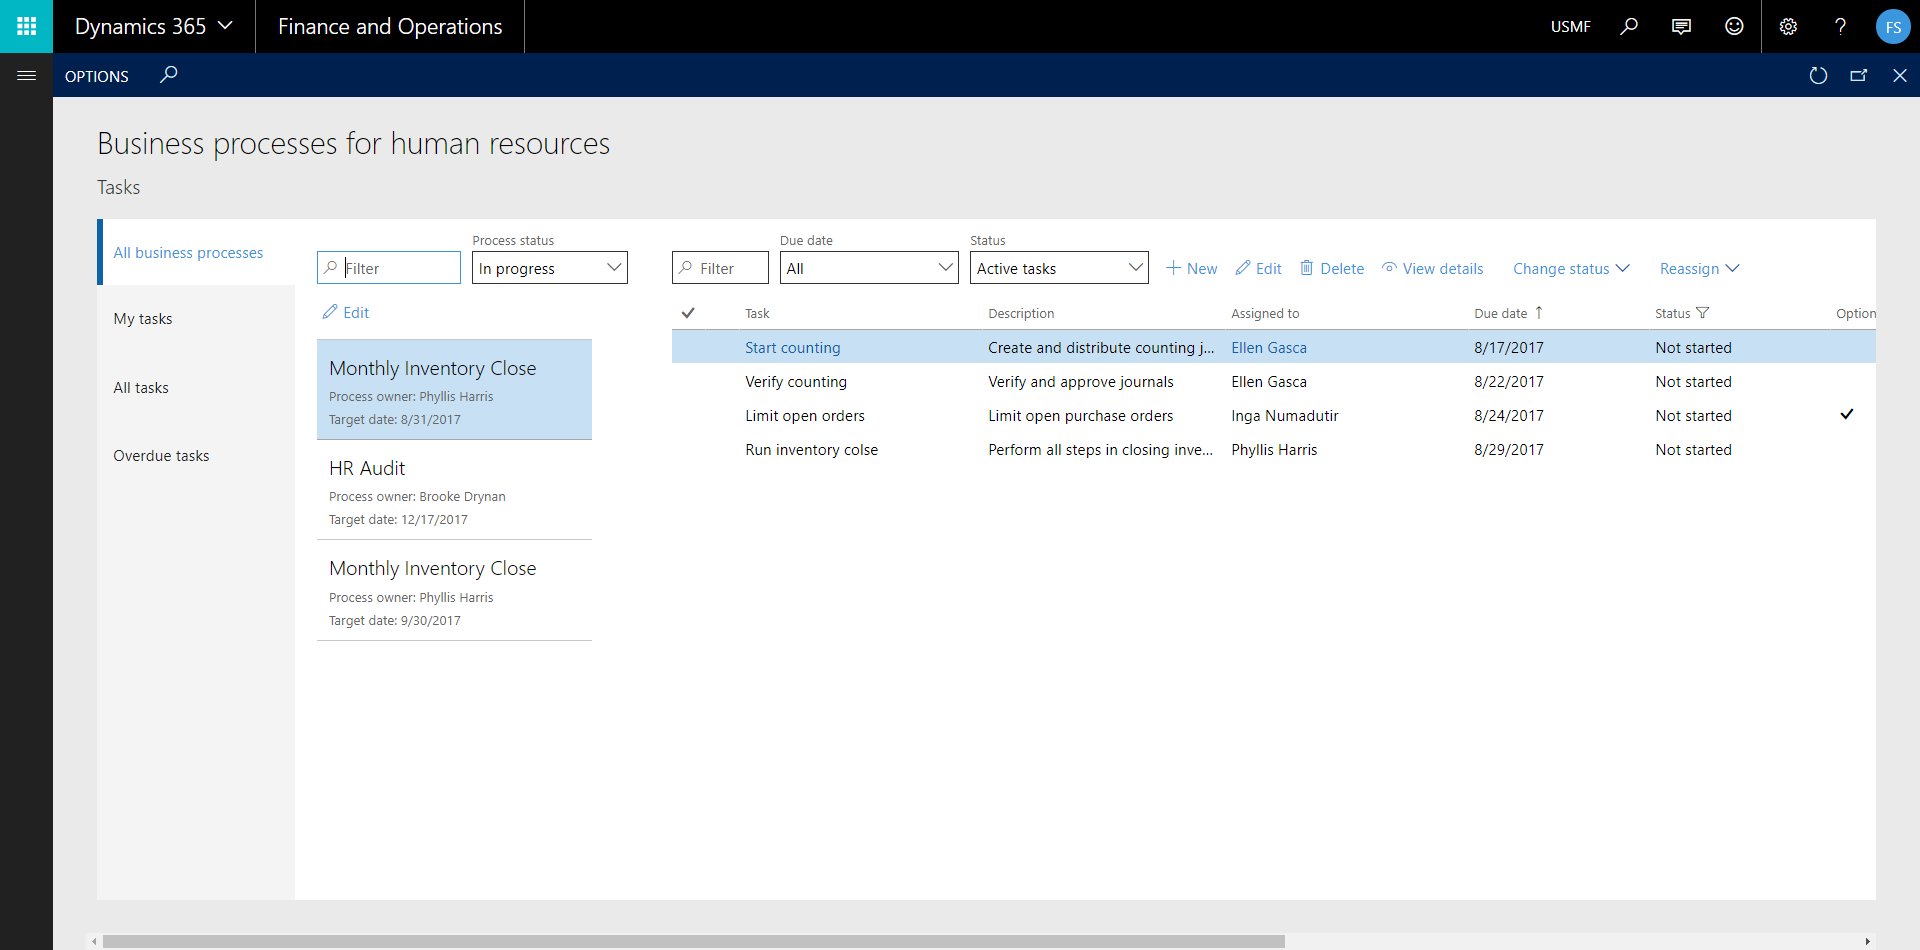
Anyone can view the ongoing processes in the “Business processes for HR/Payroll” work space which has a filter for each process type and has the all and overdue list, while the “My business processes” work space only shows the users tasks and the templates their responsible for.
BP12.png

It is also possible to create new tasks for a running business process and one can create blank templates and just fill them in as you please.

The users will be able to view their assigned tasks in the “My Business Processes” work space. They can view details, change status (In progress, Completed, Canceled) and reassign the task to other workers.
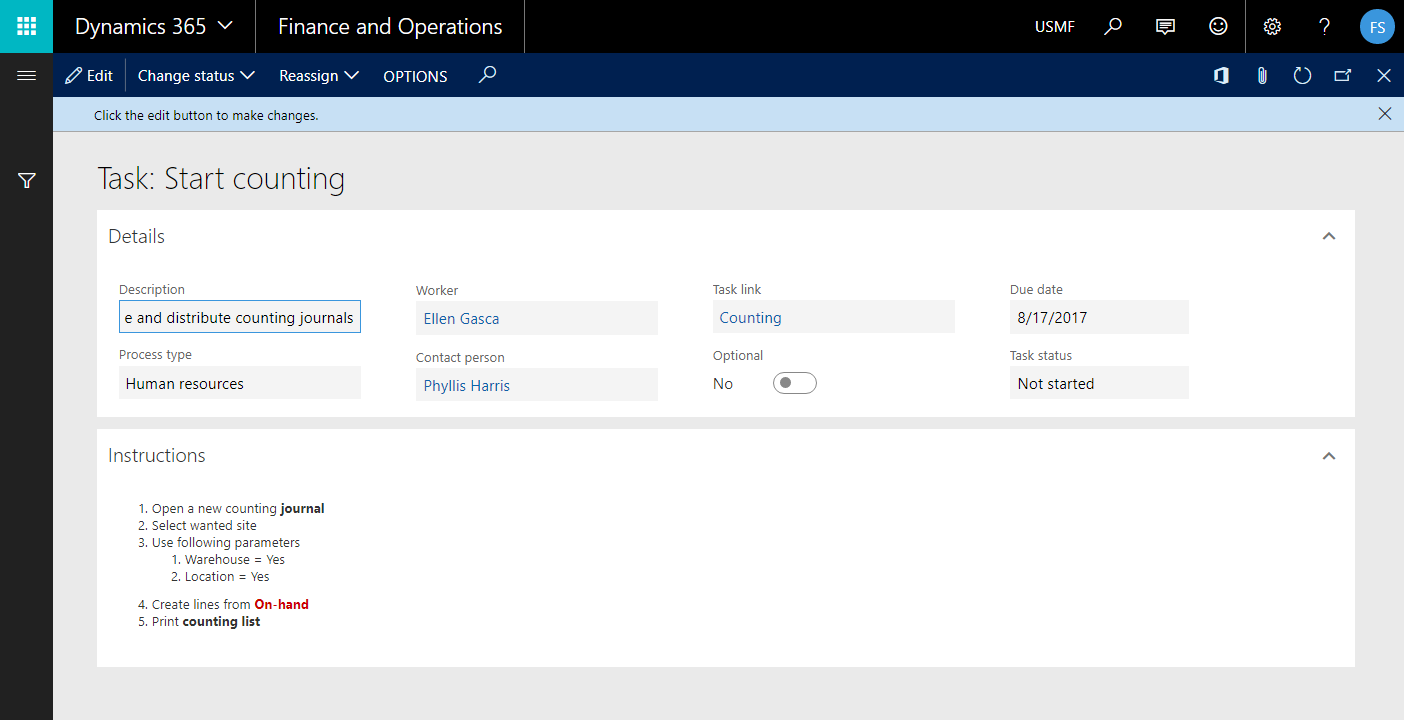
BP11

Once all tasks are completed the business process instance is still set to “in progress” and you would have to mark the instance and click the “edit” button where you could change the status of the business process instance to complete.
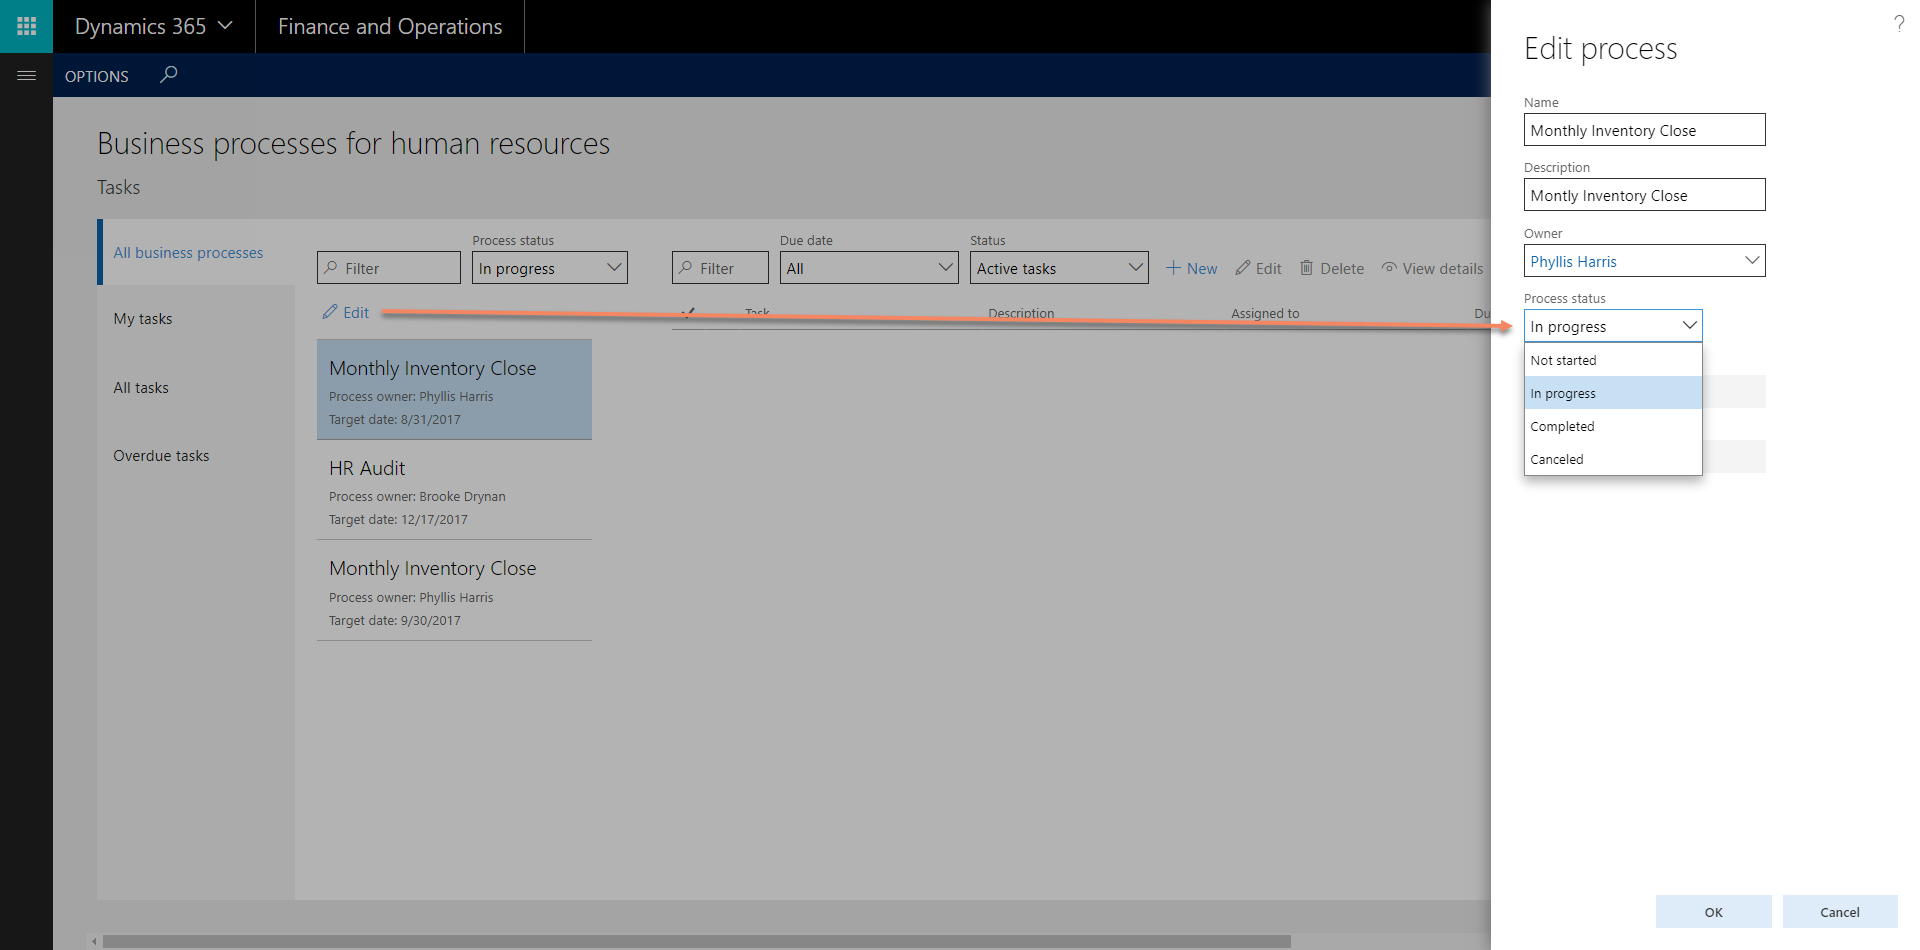
BP13.png


Summary

All in all a good first feature release, but I would hope that they would move a bit closer to how other features are developed. I mean that they have relied too much on the work centers for access to data, where the work centers are used instead of feature oriented forms. I couldn’t easily find a form that showed me all tasks except in the work centers. They should quickly remove two of the work centers and add a possibility to navigate to a form instead. Also a related links in the work spaces to get to the configuration and some statistics for each task would be preferable…

I’m also missing some features that I hope will be implemented in the future. Like task dependencies and also a more role based approach among other things. Assigning templates to defaulted workers could give some headache and is a killer when moving between companies.

I am hoping this will in time also bleed in to the other task handling systems in the solution like the case management and more.

Data Validation Checklist

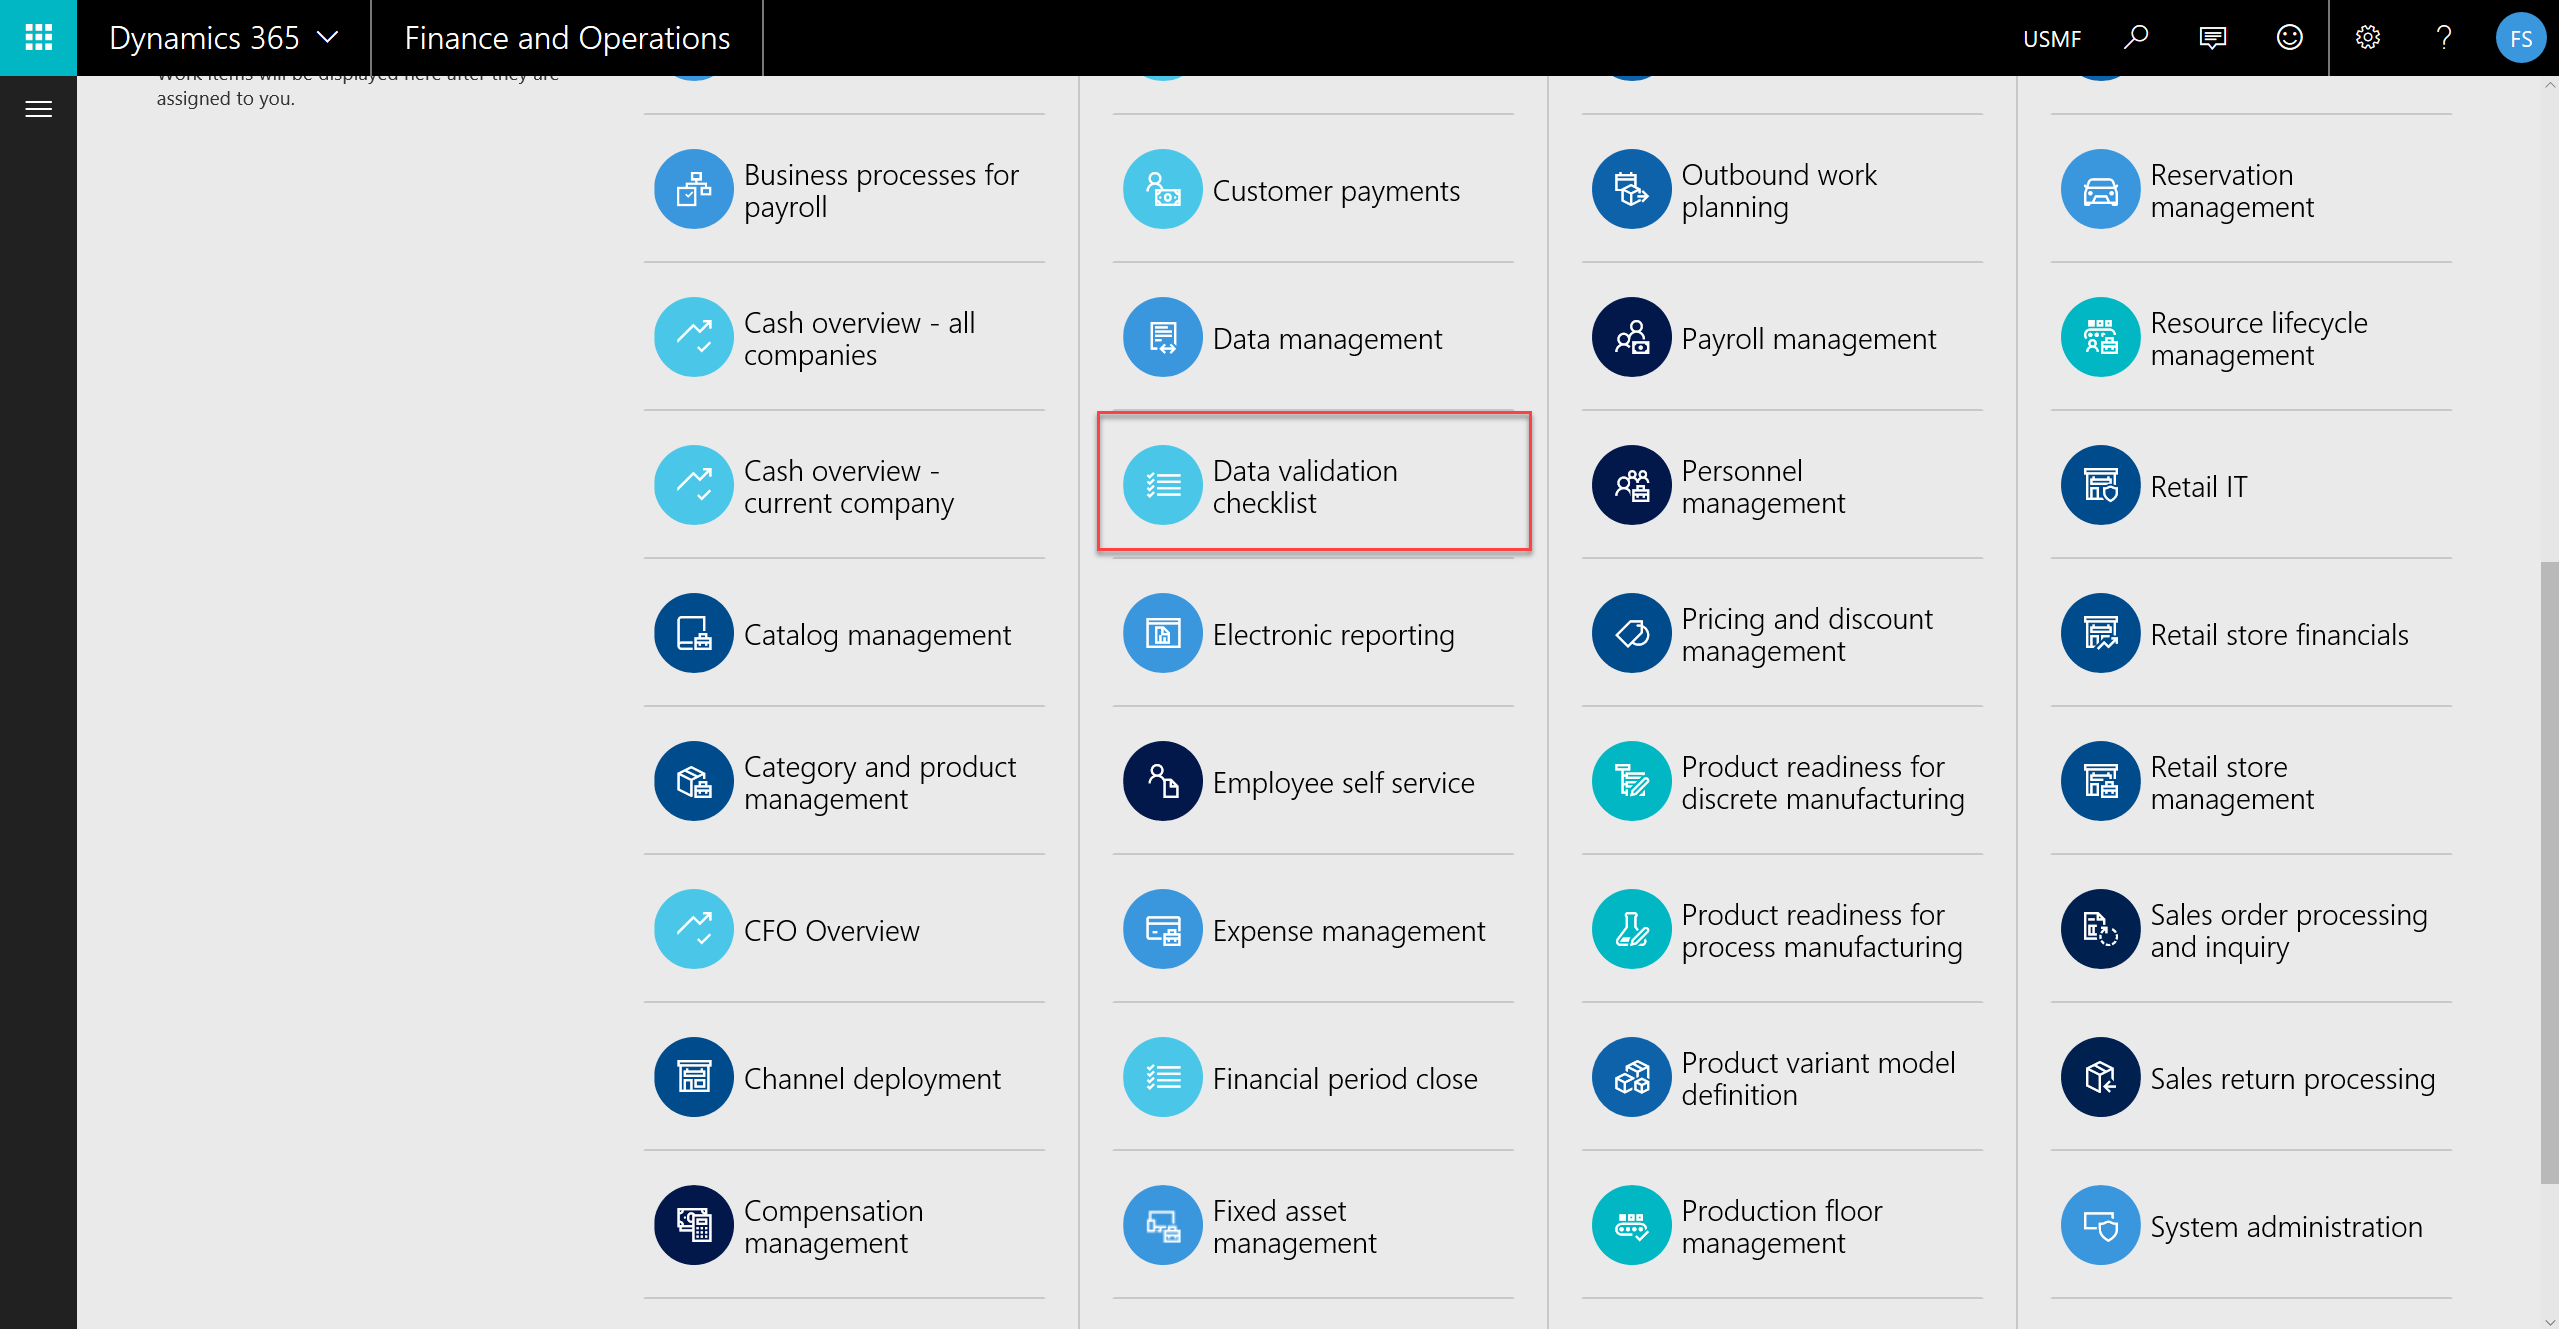
In the latest release of Dynamics 365 for Finance and Operations, Enterprise Edition there is now a check list feature for creating new setup in the system. It lets you enter a set of tasks within a configuration area and attach a menu item link for each task. Then you select the companies that this falls under and the task is then duplicated for each company and you can select the performing user for each particular company task.

I noticed the feature as it has its own Workspace and it isn’t to hard to understand, so let me run you through it real quick.
DVC_01.png

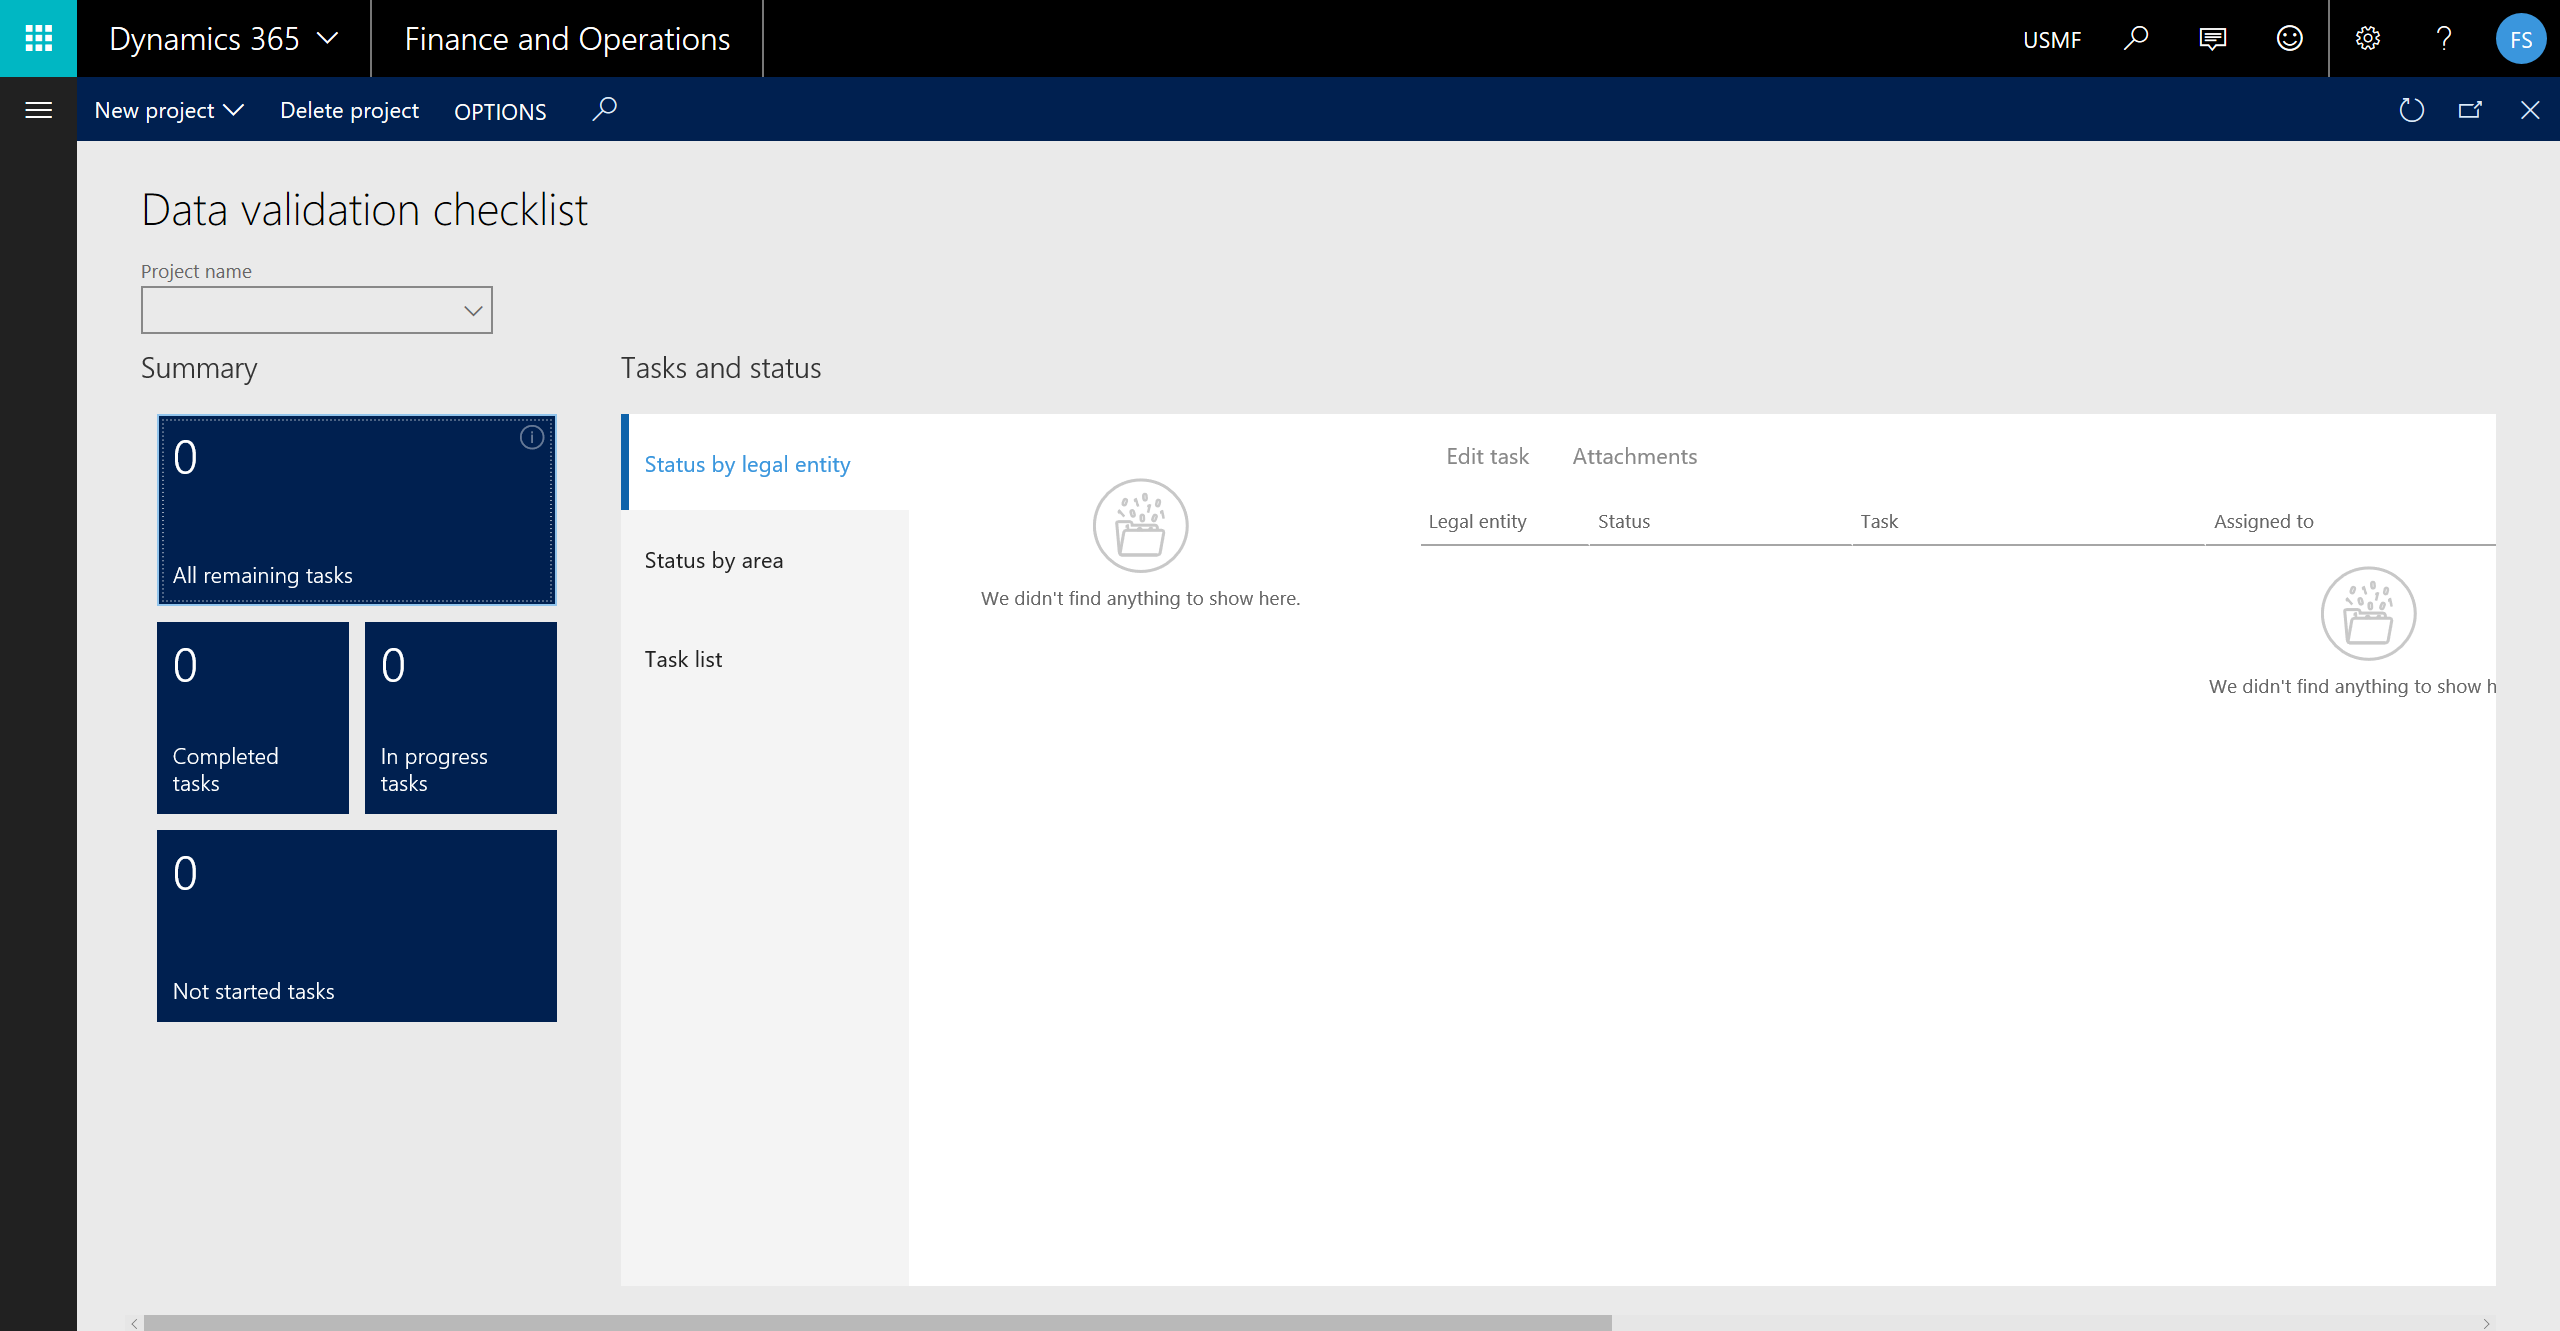
Opening up the workspace you’re faced with a page which shows you a task overview for a given DVC project.

DVC_02.png

If you tick the Project dropdown in the Contoso demo database there is already a project present which clearly shows the intent of the solution, but I’ll create one from scratch to run you through it.

Setting it up

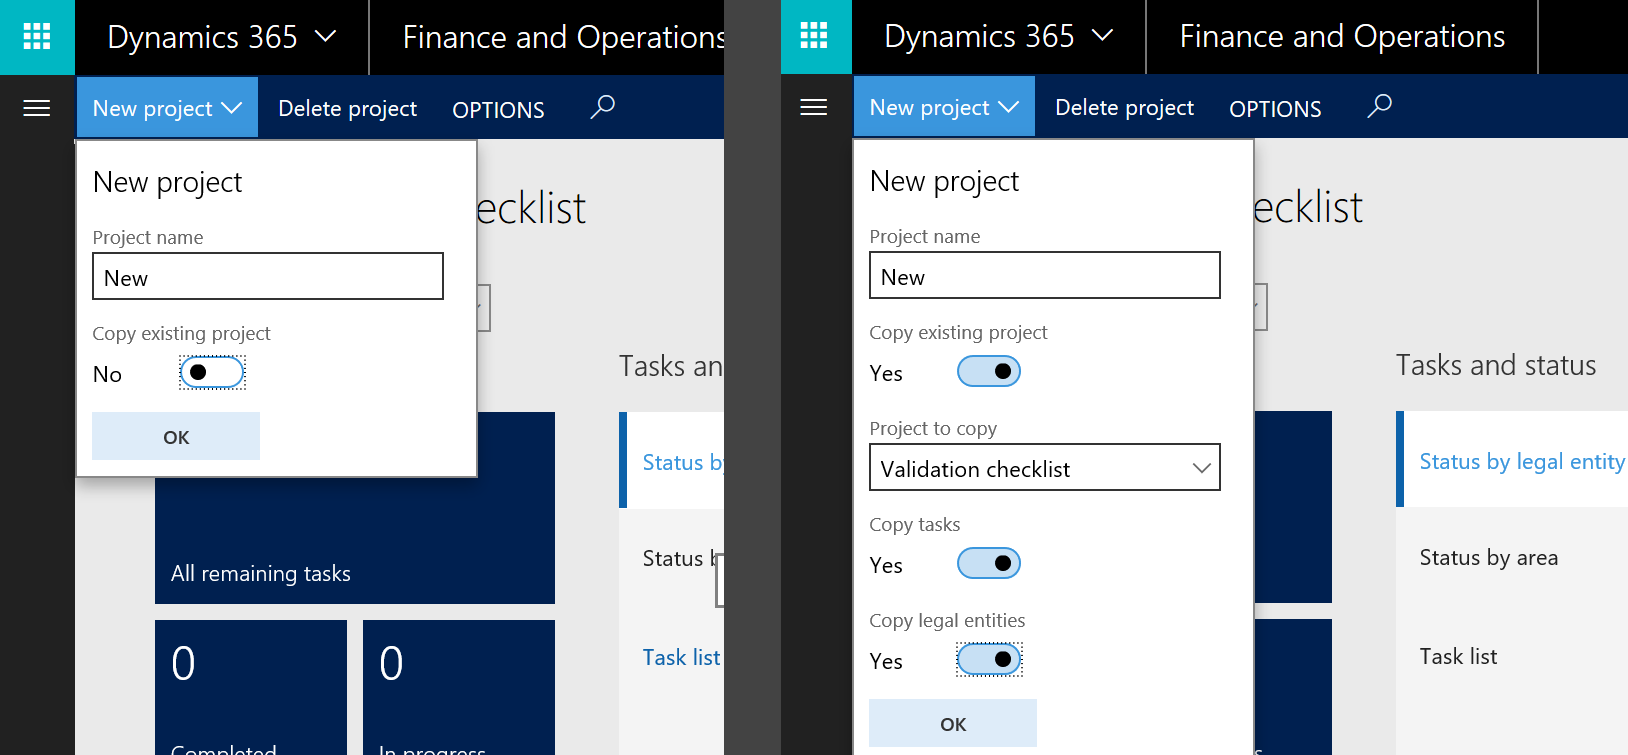
1. Create a new DVC Project

You create a new and can copy from an existing project and select what data you want copied.

DVC_03.png

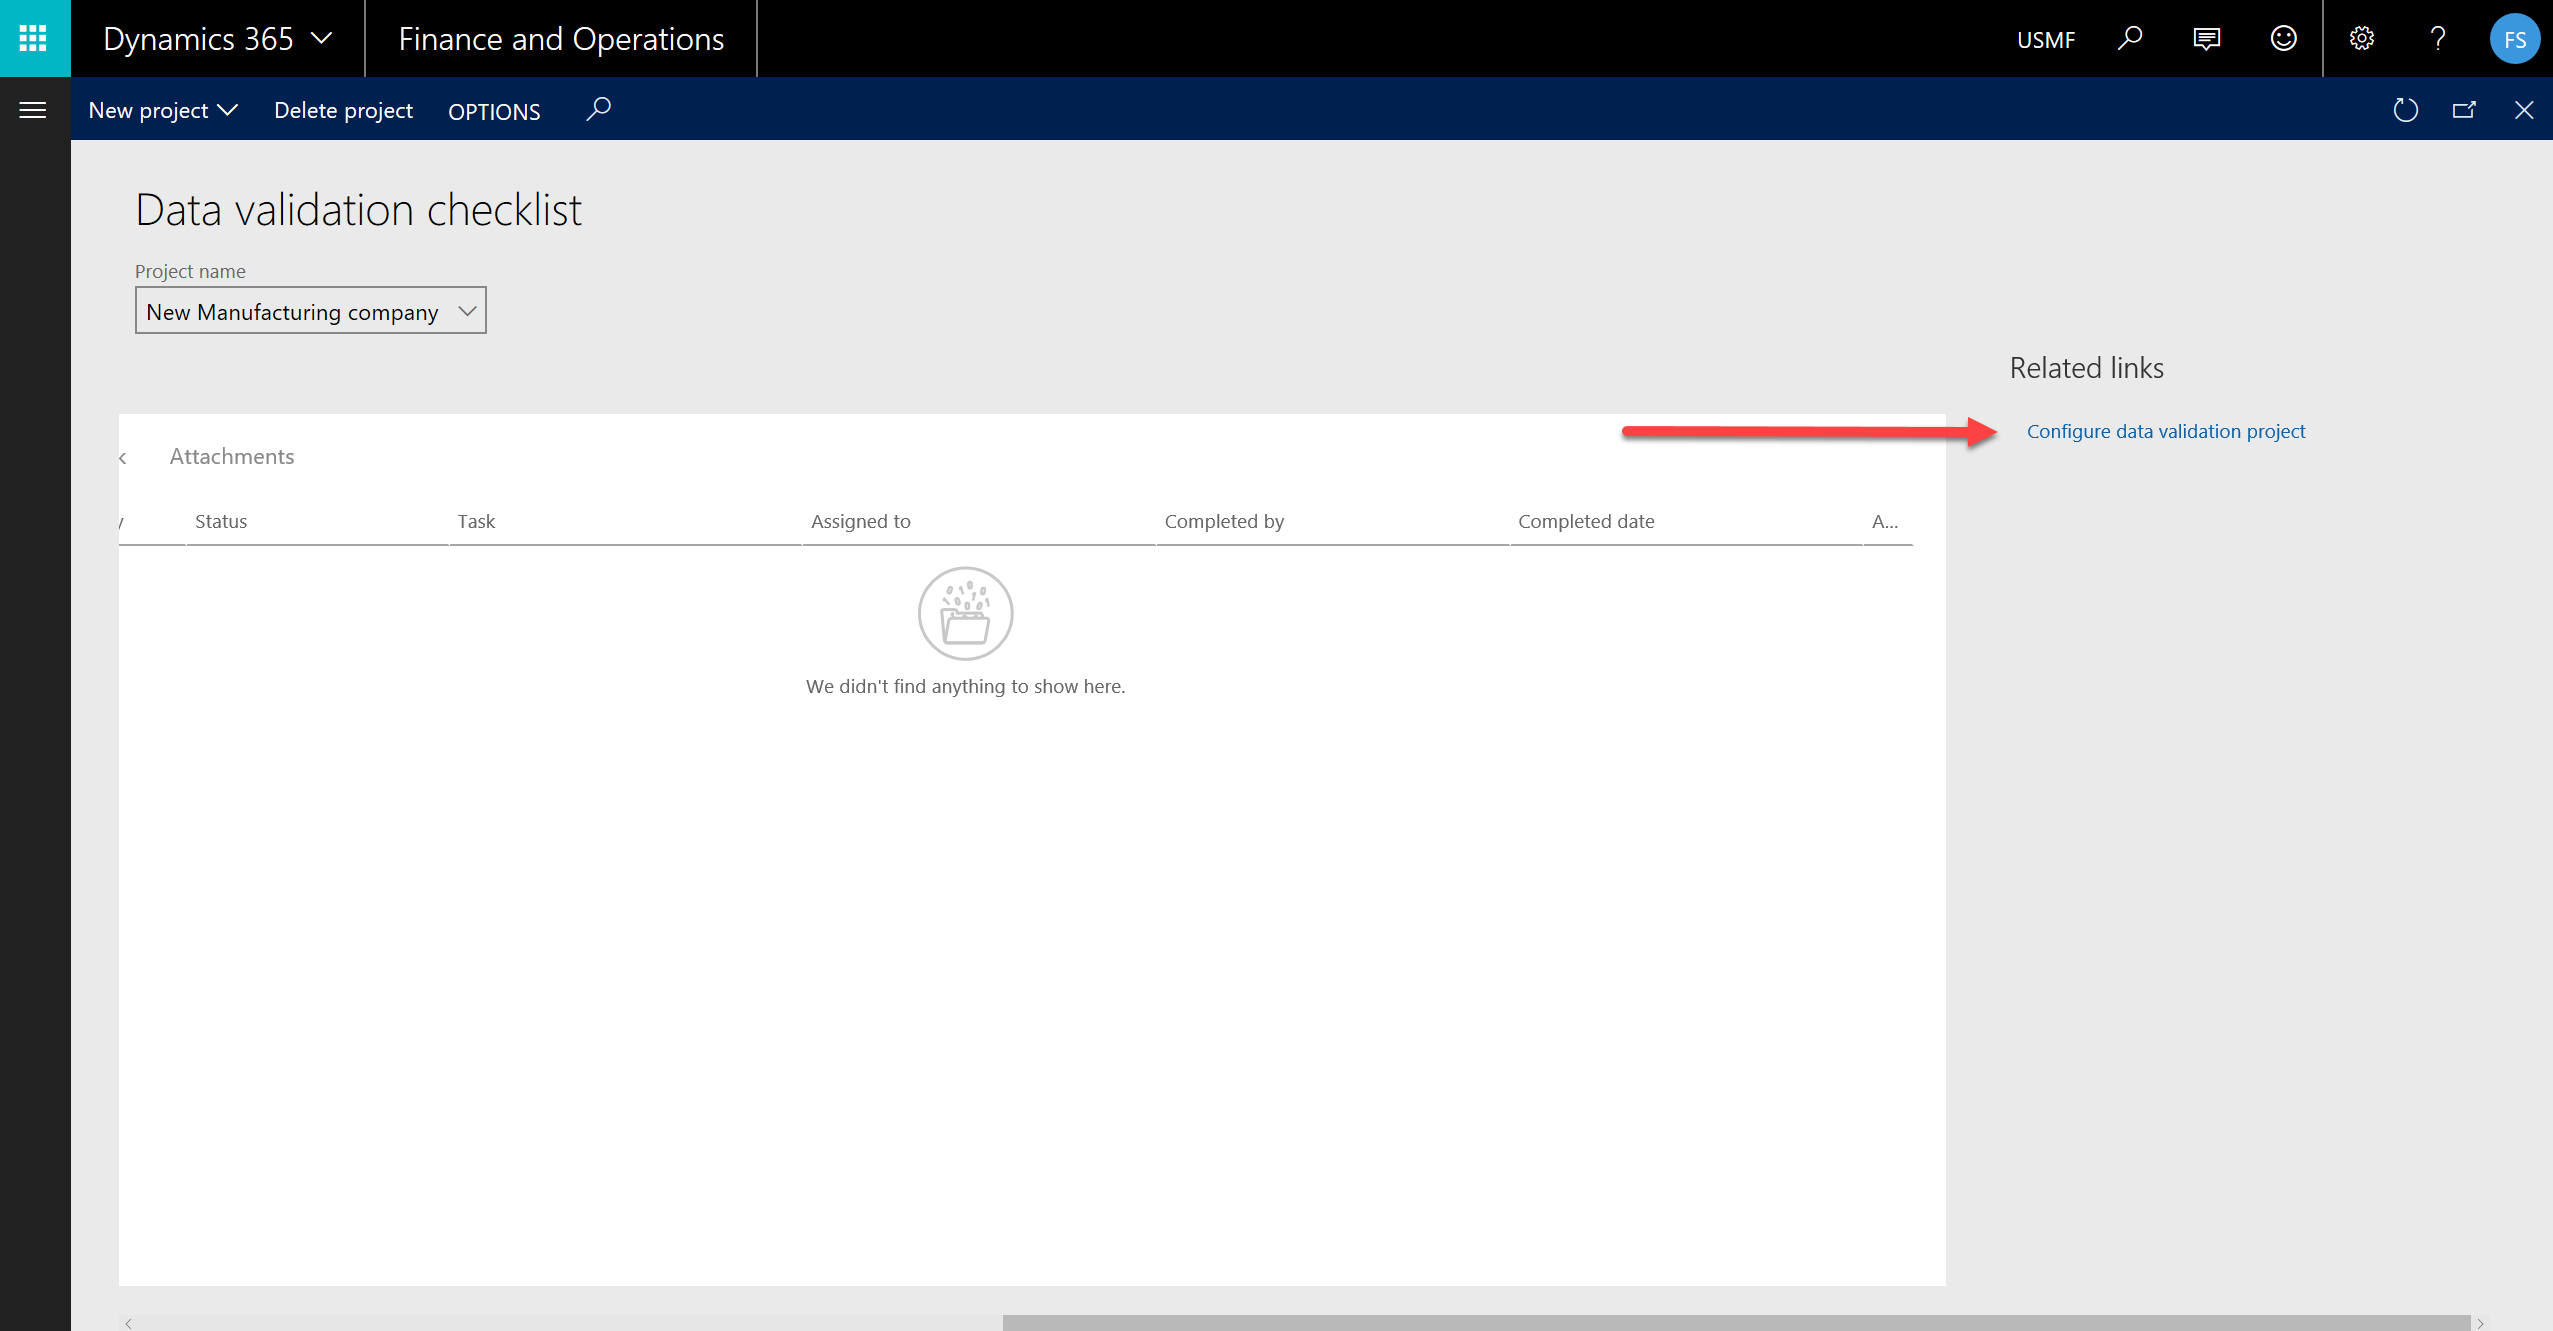
Scroll all the way to the right in the workspace and click the “Configure data validation project” link in the “Related links”.

DVC_04.png

2. Create Task areas

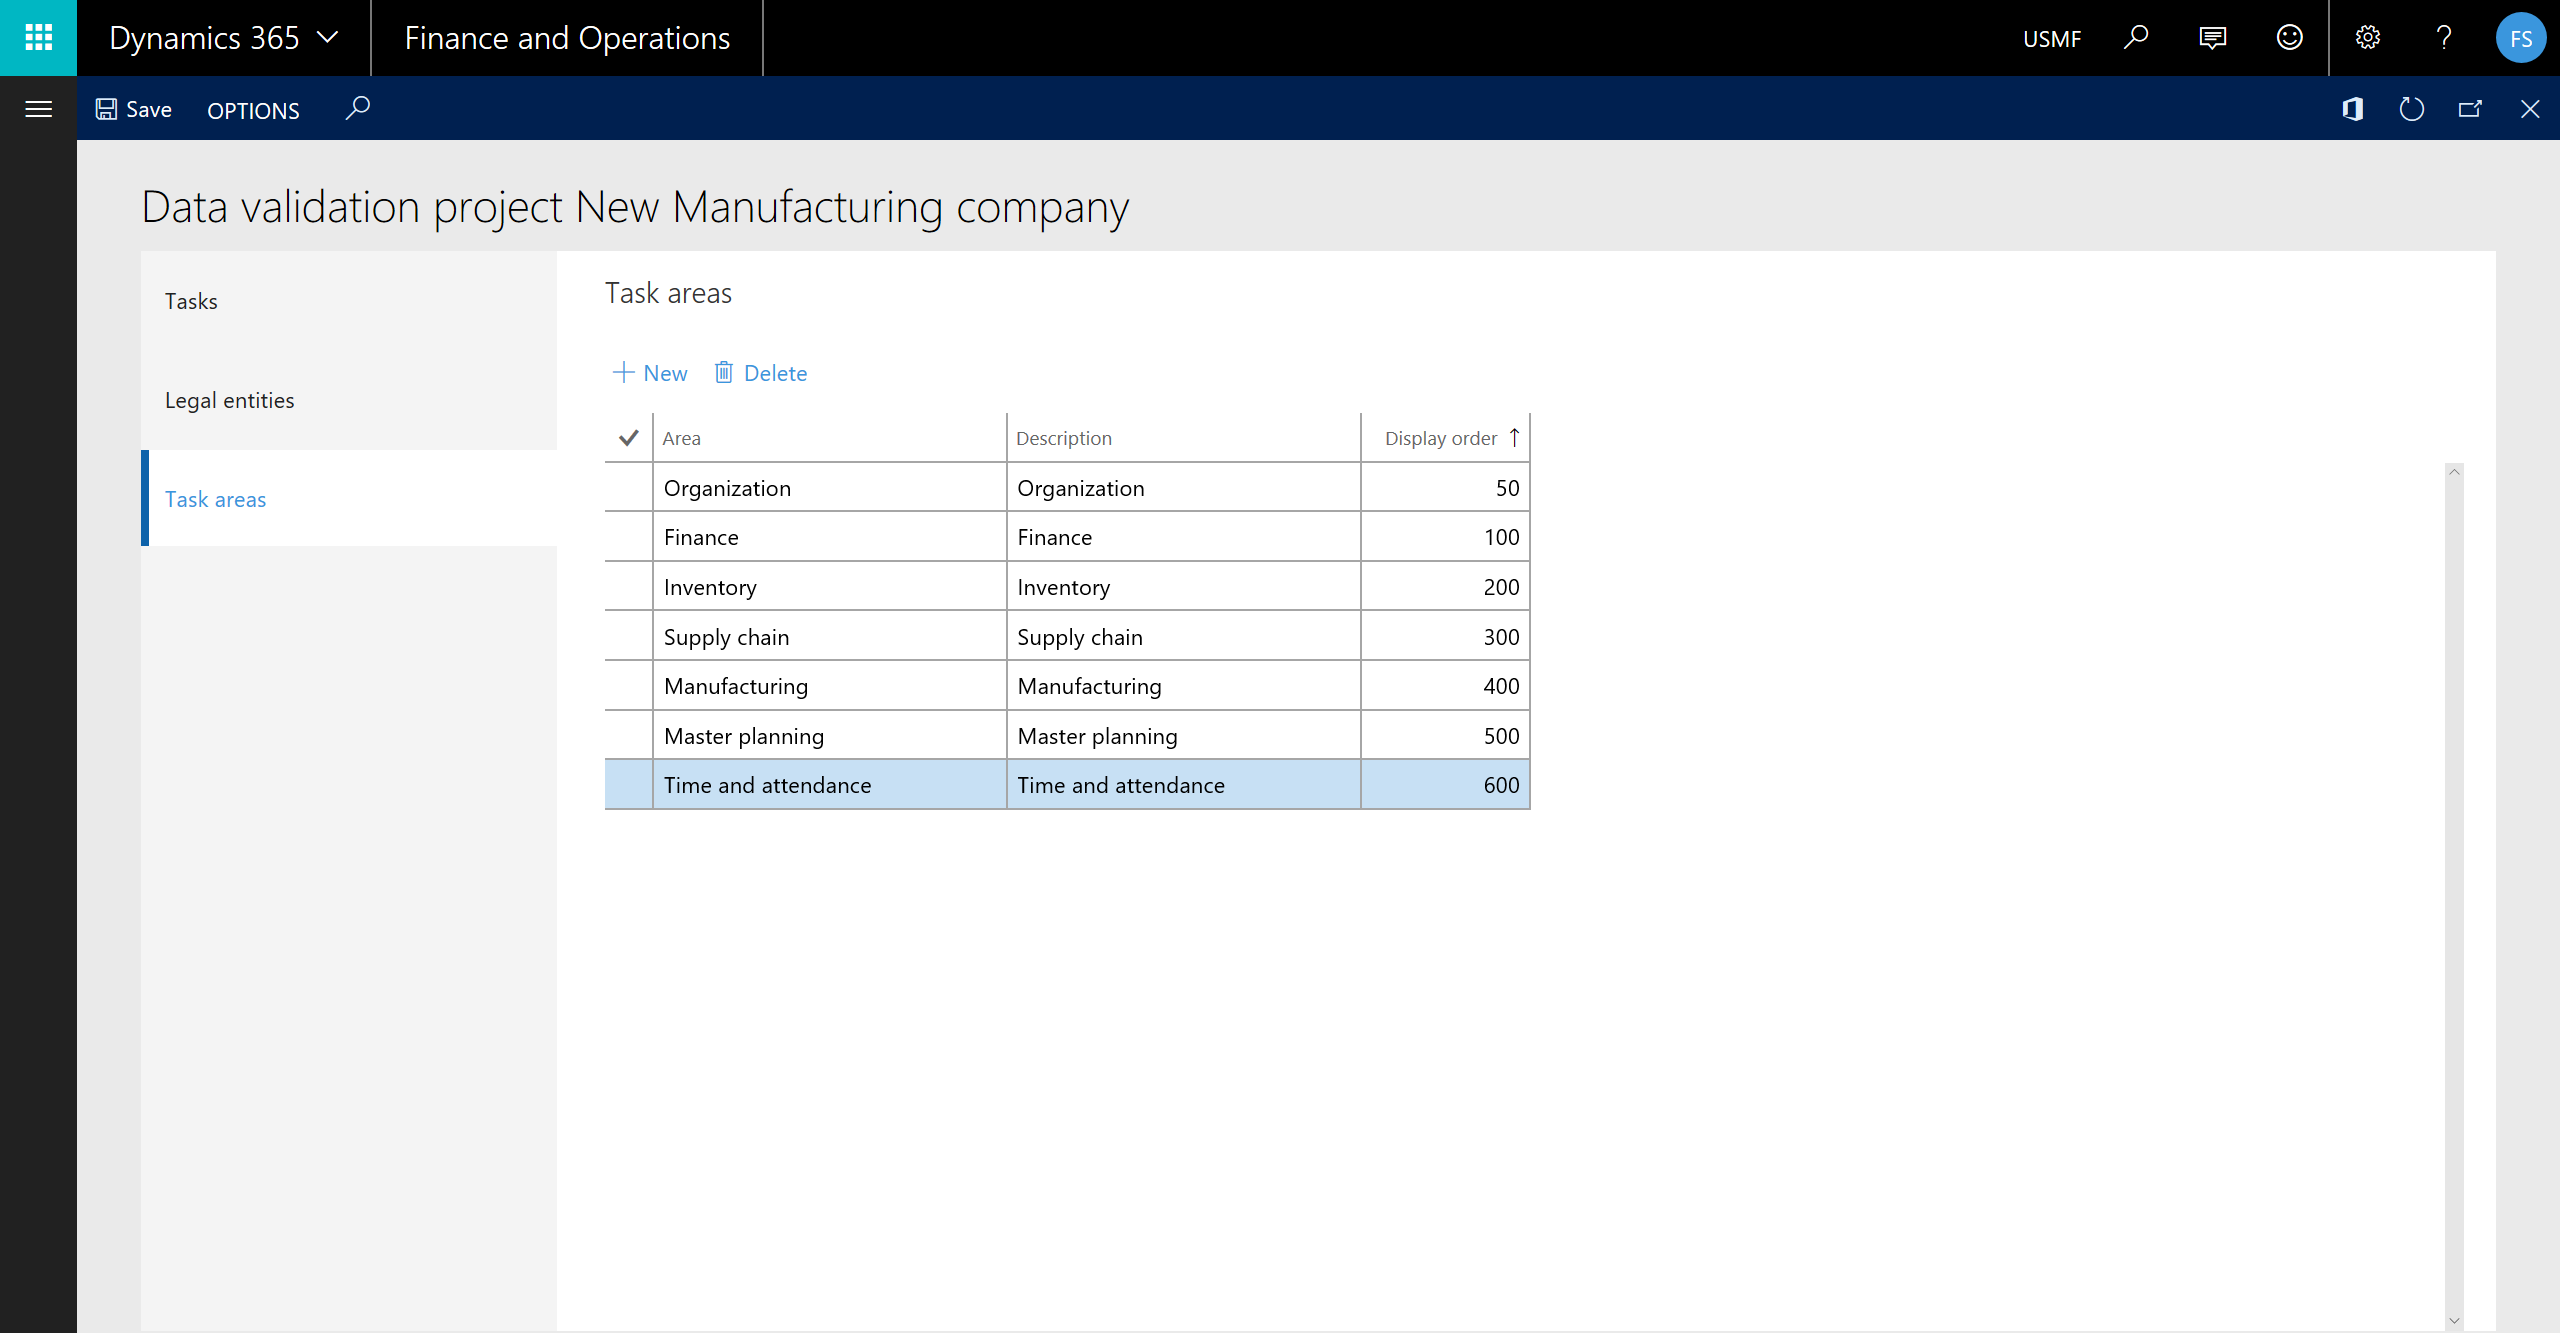
First create the Task Areas you need. Note that the Task Areas are global and shared between all projects. You can create multiple areas for different processes, but all will appear in this list eventually.

DVC_05.png

3. Select your Legal entities

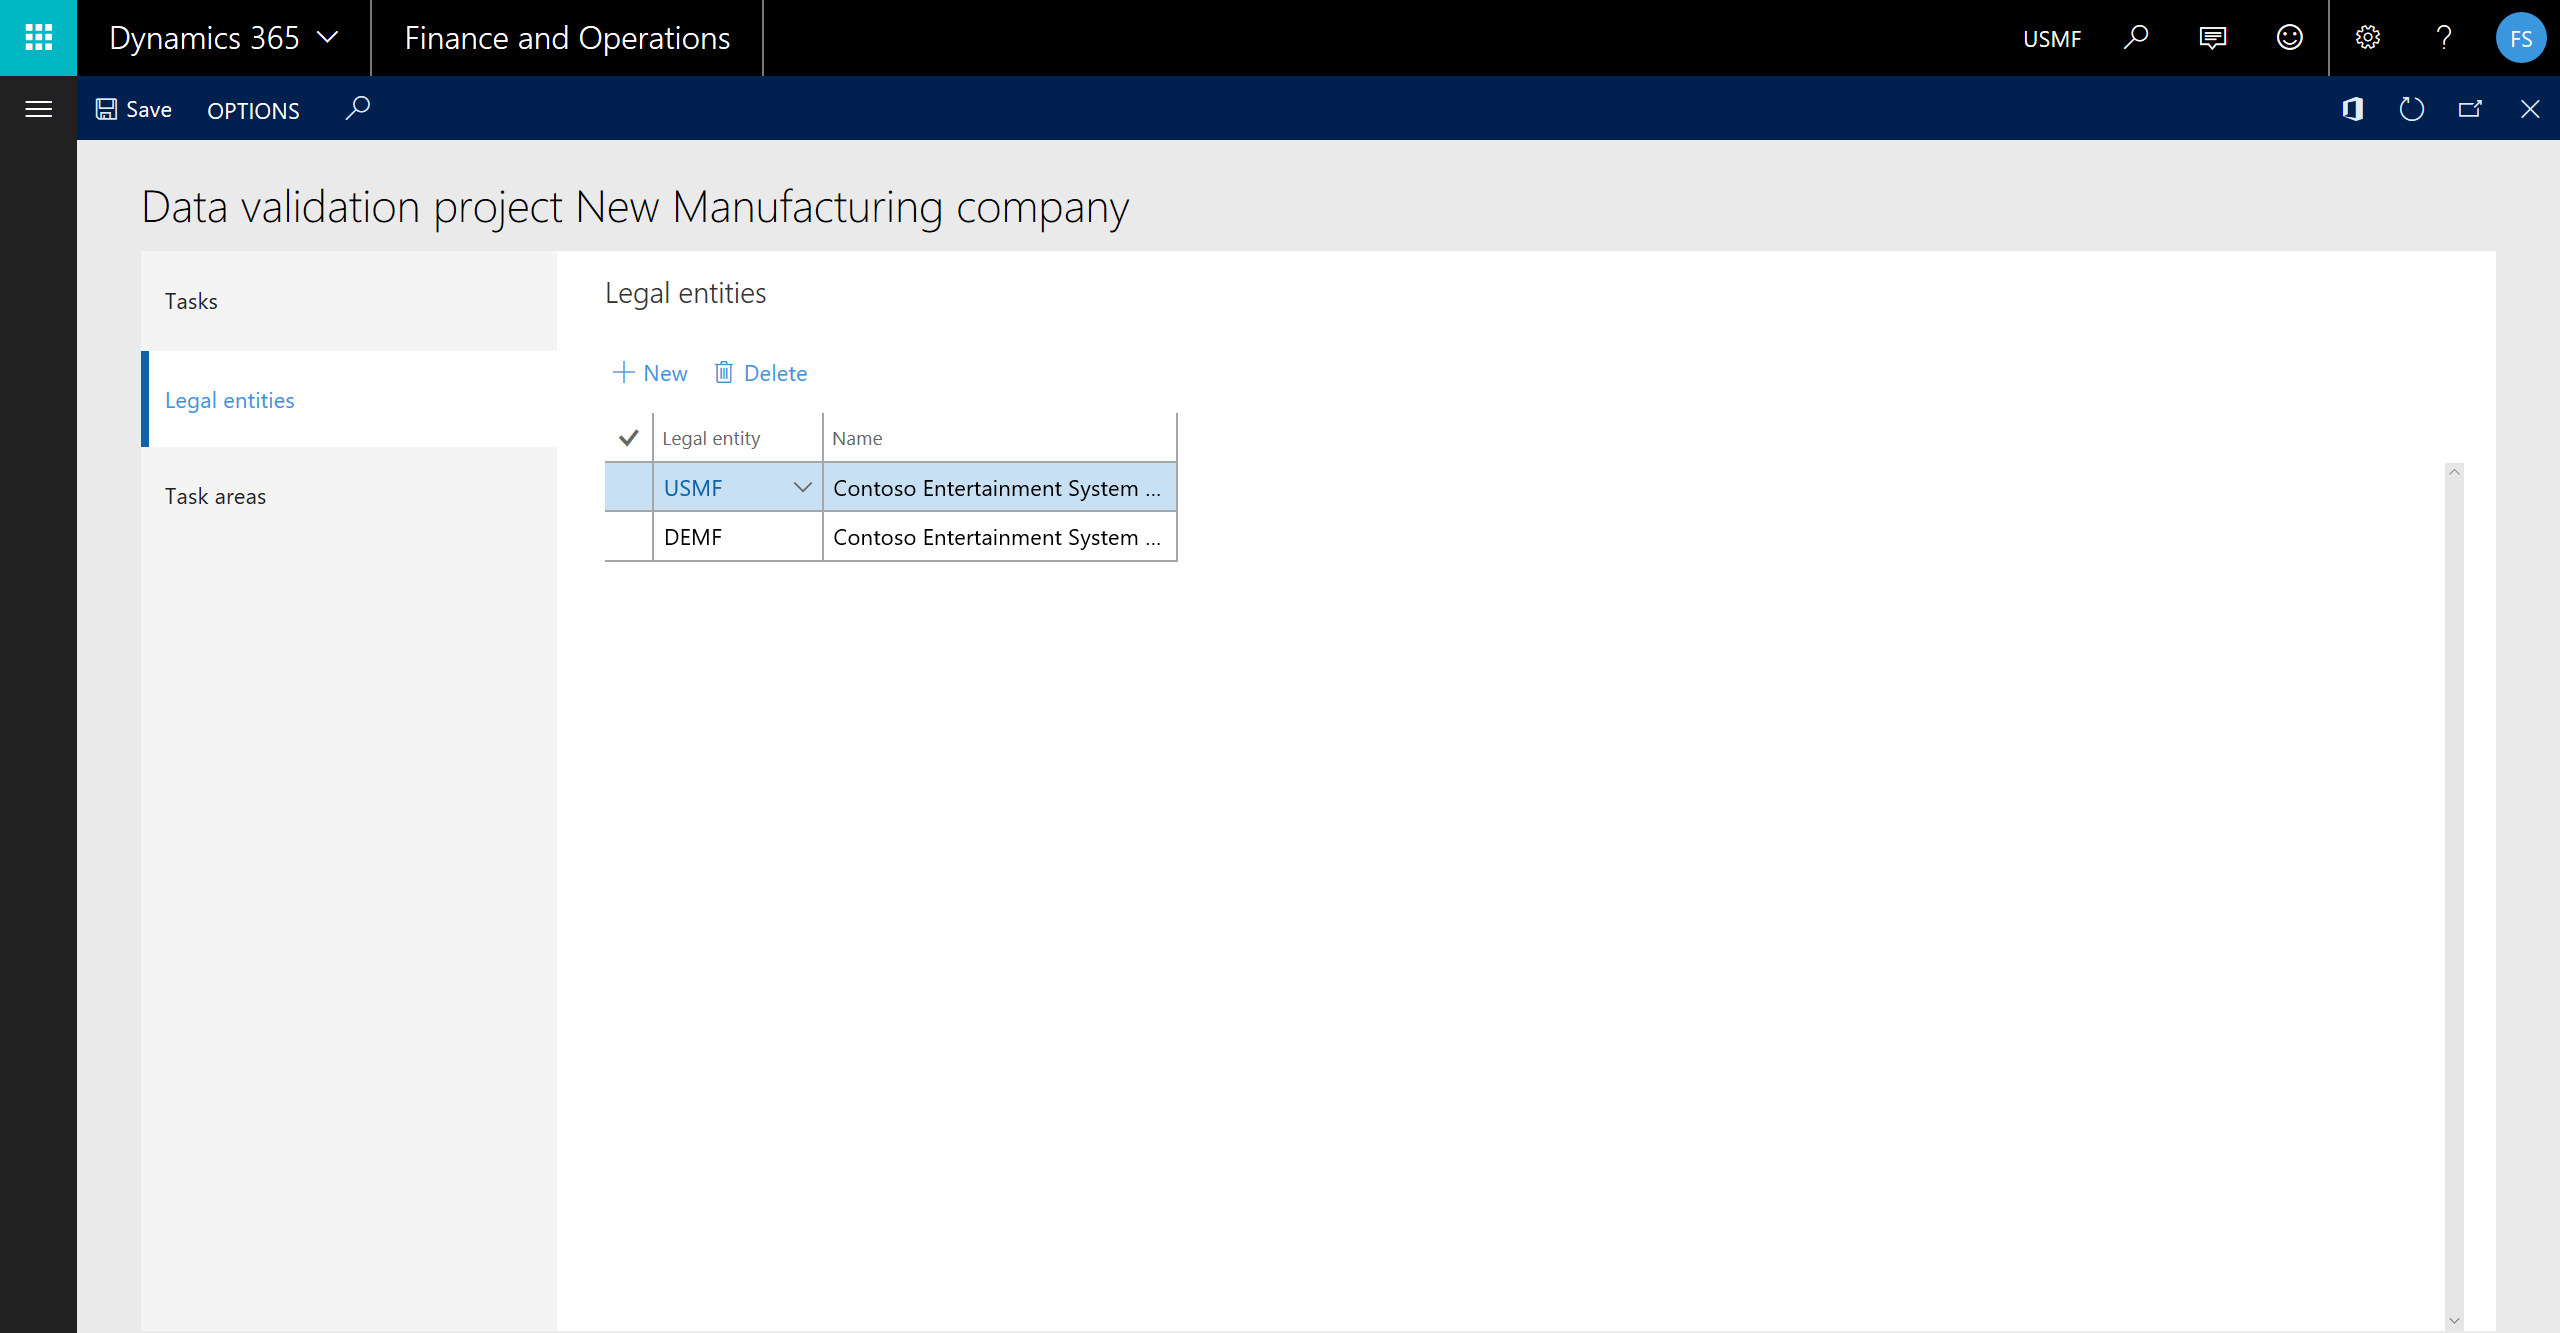
Select the required legal entities you want to configure. You can do this later also.

DVC_07.png

4. Create your task

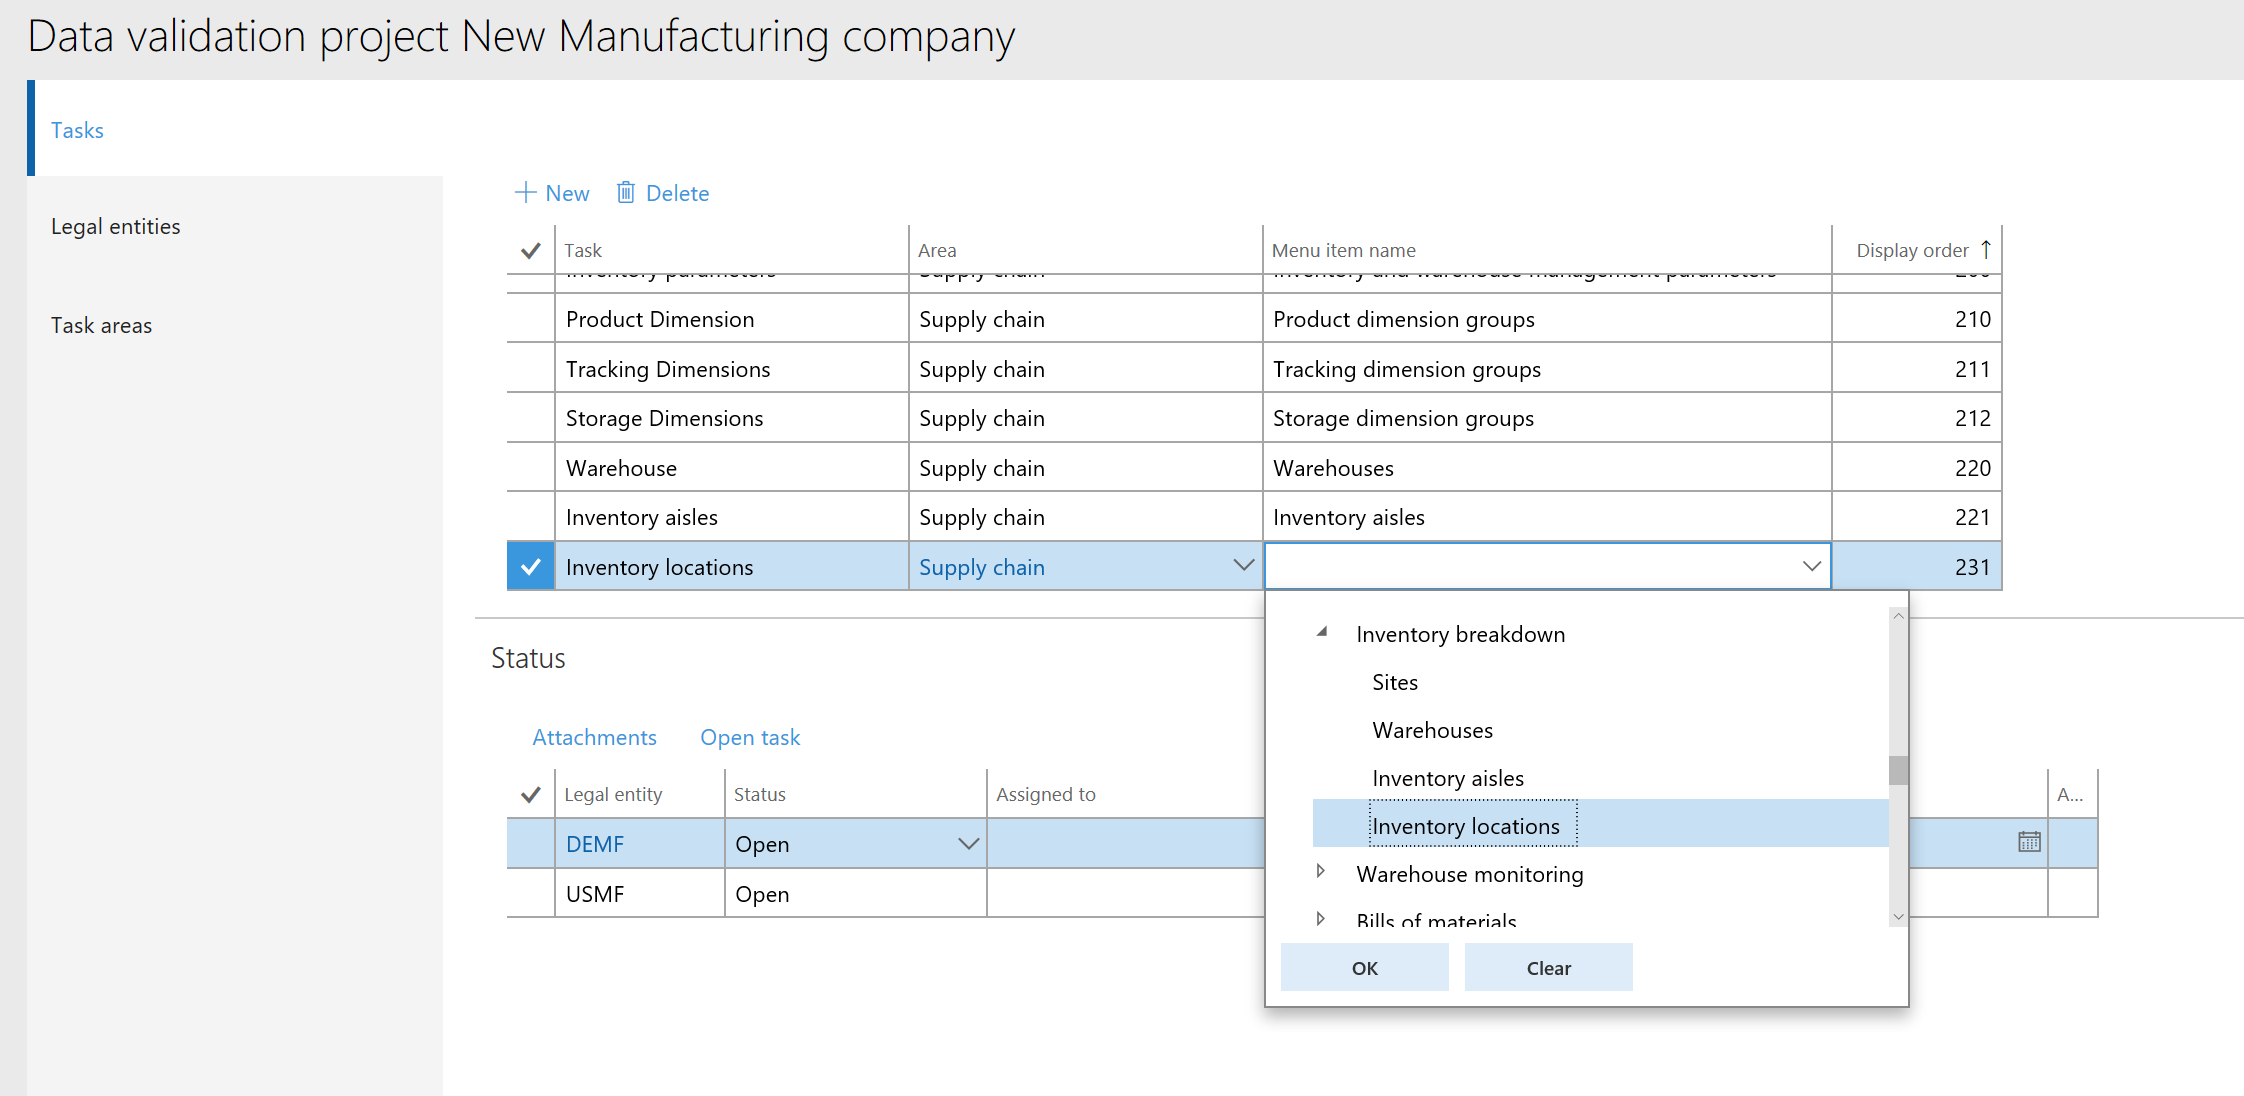
Add a task description, then a task area and select your menu item from the drop down tree.

DVC_08.png

The display order will let you reorganize your tasks afterwards. You can have as many numbers as you want (pretty much). It will sort numerically, so 20 comes before 100. If you want to have a 2, 20, 200 type hierarchy… It won’t work.

5. Assign resource

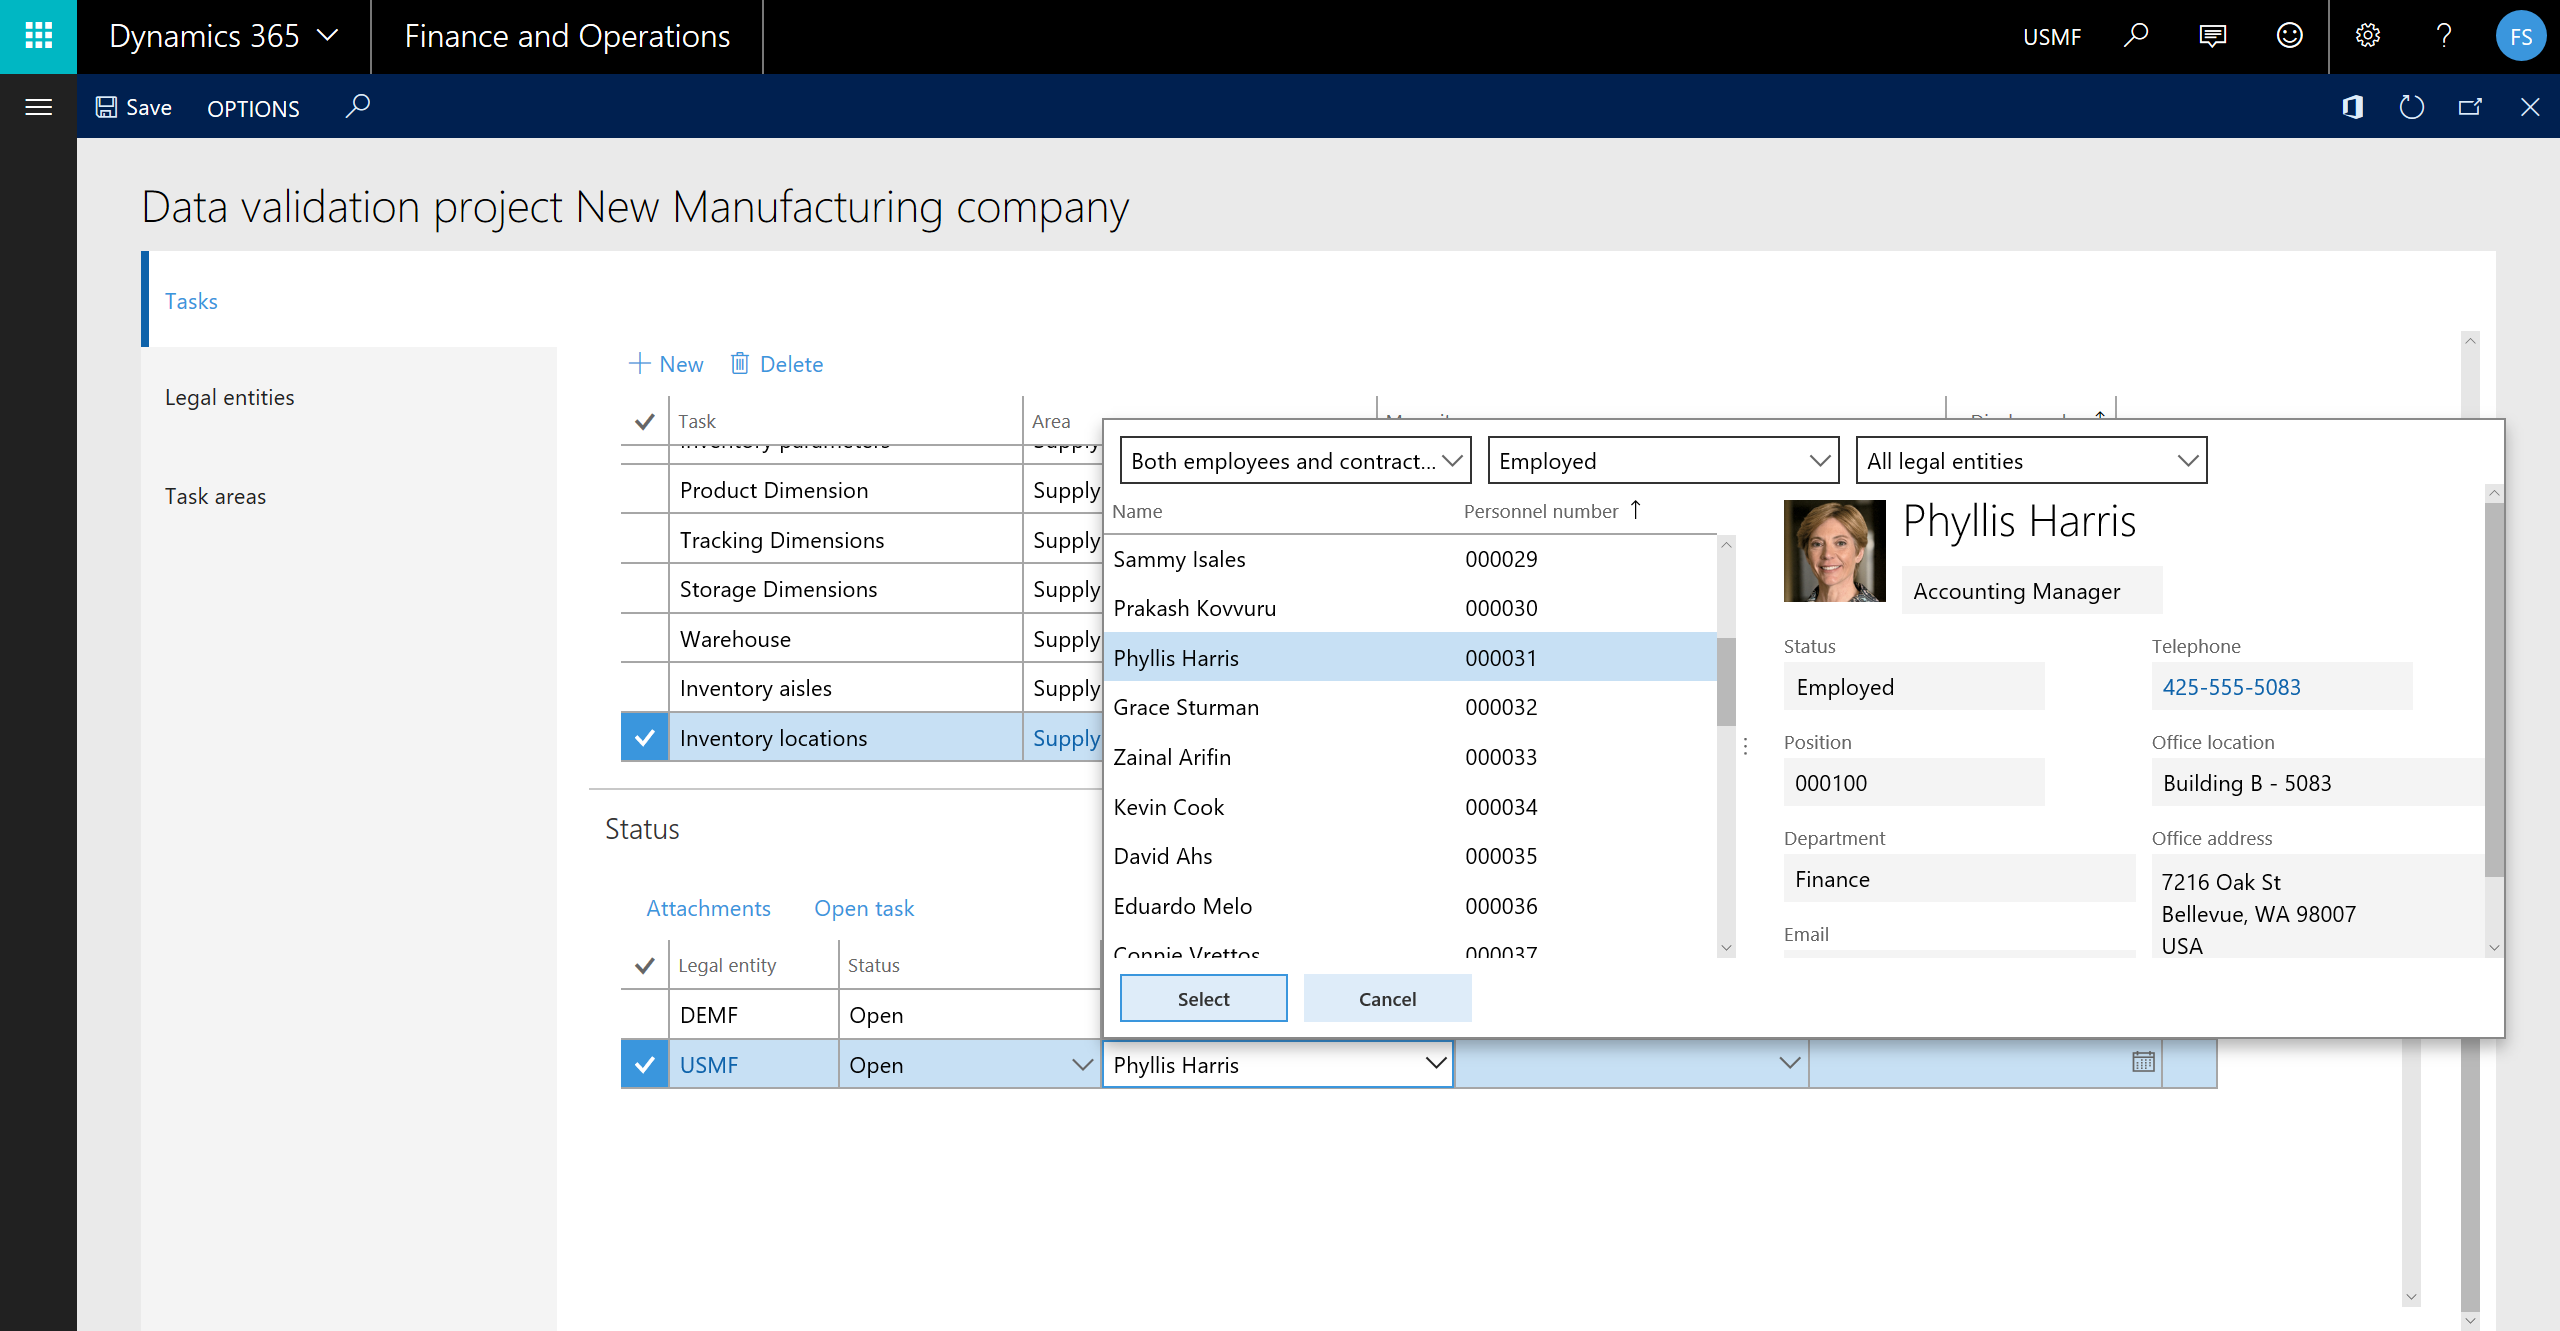
If you’ve added companies you can attach an employee to the task for each company selected for the Project

DVC_09.png

6. Add an attachment

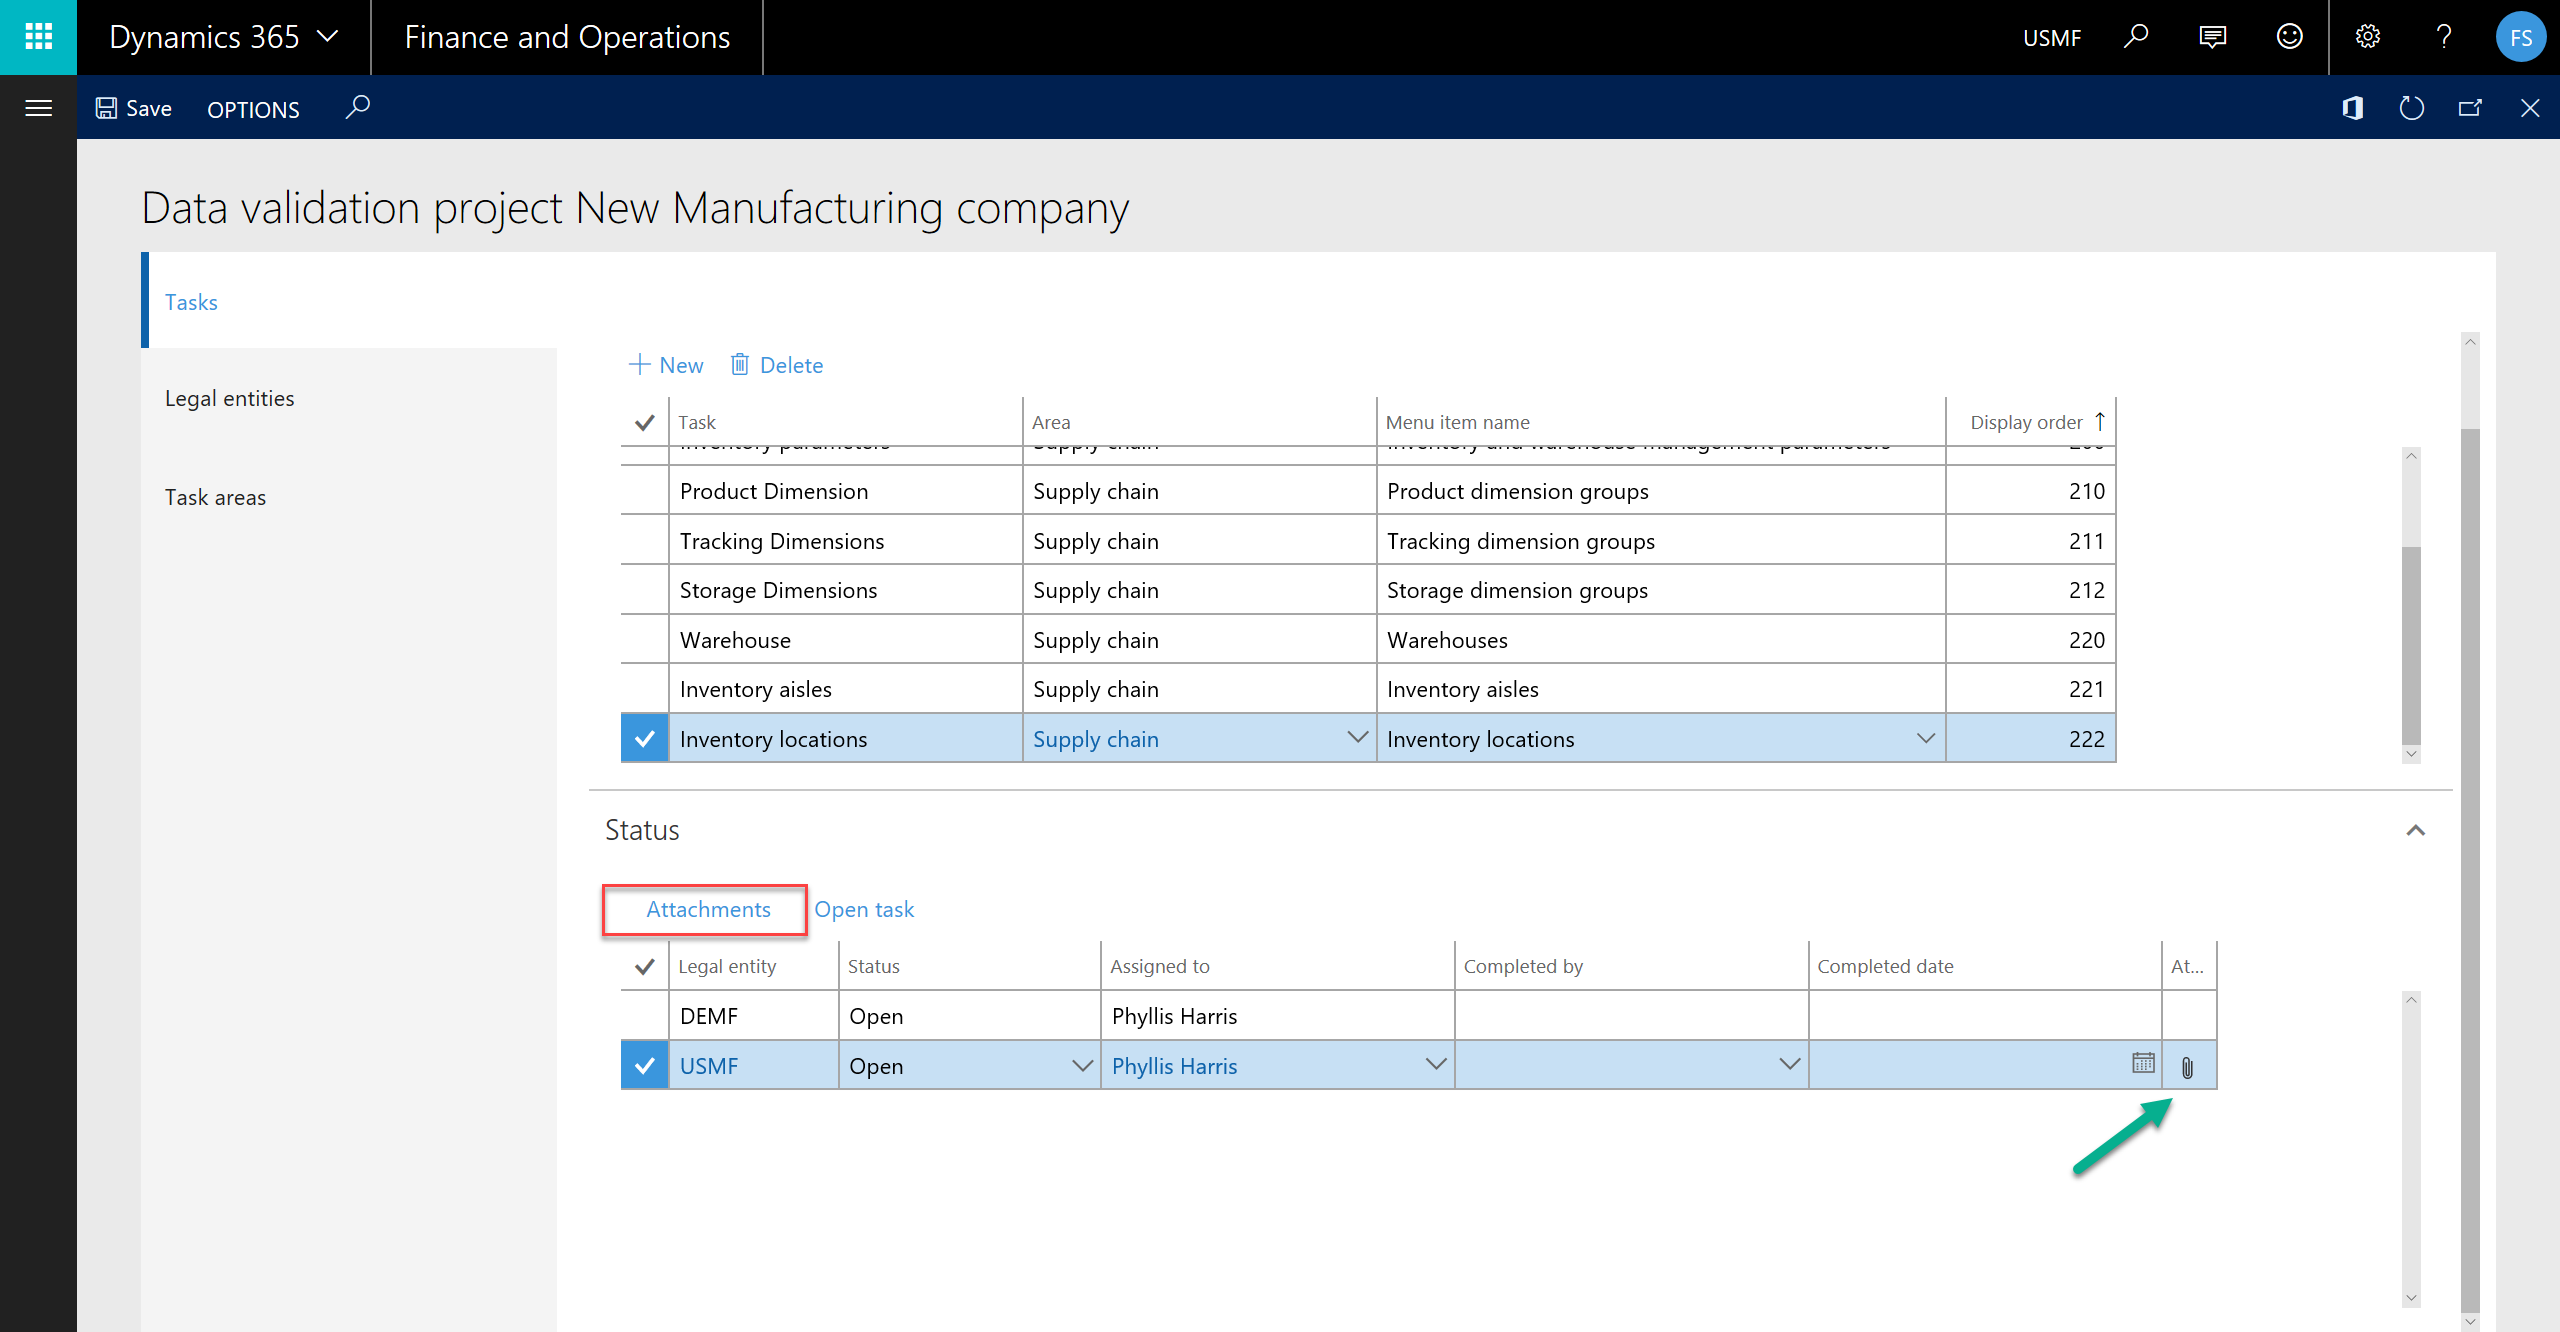
You can add attachments for each company task. This is great for spreadsheets of data or other type of documents that shows what data to control against. Just click the Attachments action menu item. Once attached the binder icon will show up (green arrow).

DVC_10.png

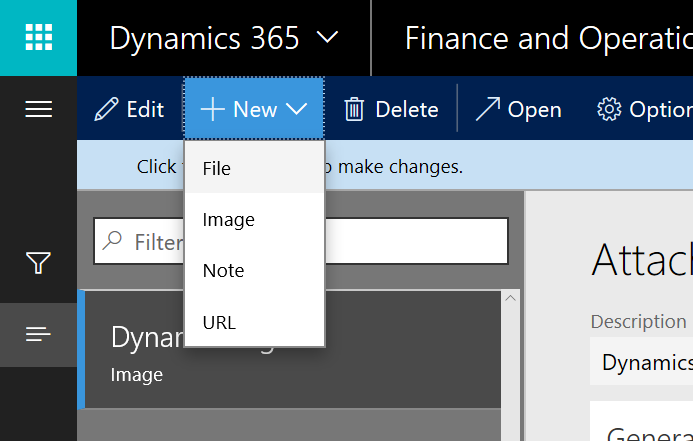
You can add any type of attachement that is defined in the document type settings. Just click new and add it.

DVC_11.png

That basically covers the setup.


Using it

Using the feature as an end user isn’t all that intuitive. I would love to see these tasks be created as other general tasks in the system and the user can work with them as any other task. I couldn’t find out how, so if you do… please let me know.

1. Set to “in progress”

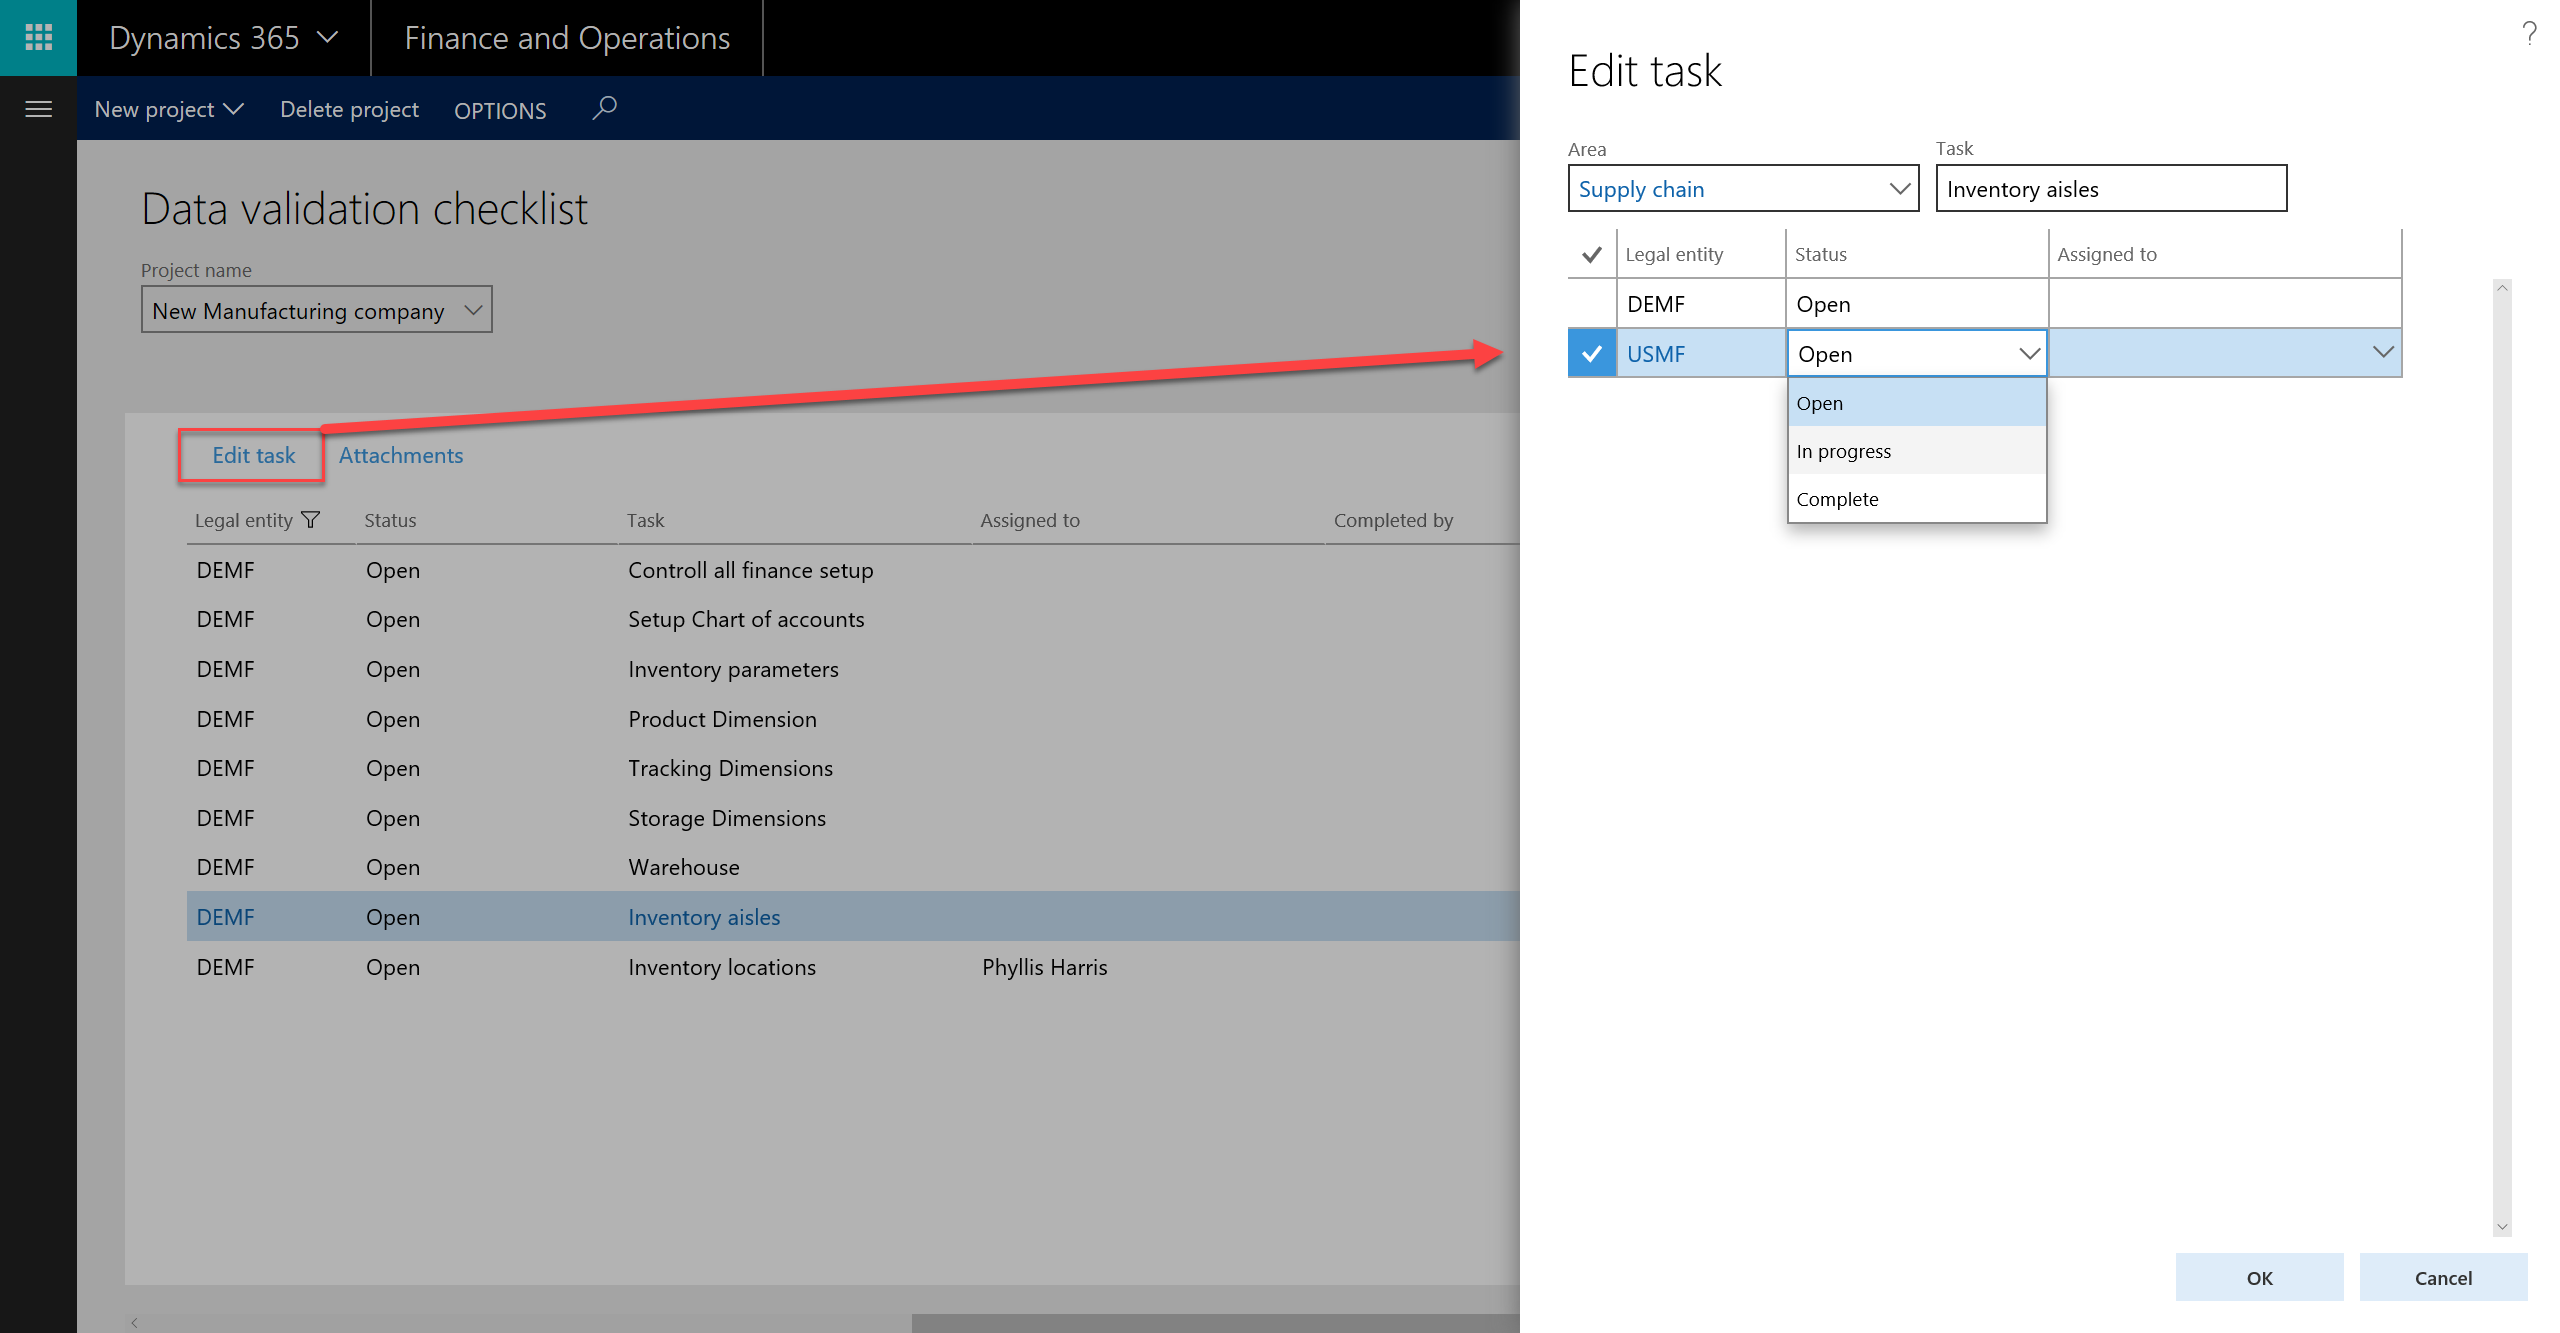
You would have to go to the task and click “Edit Task”. That opens up a dialogue box where you can select a individual company task (even if it already had that context from the table) and set a new status on it.

DVC_12.png

You can select an “Assigned to” person when doing this if it is not already assigned.

After changing the status to “In progress” for the company you would click the task name. This will open the assigned menu item and the person can perform the work.

2. Close the task

After completing the task the person can either assign a new person for control purposes or close the task. The same procedure as before will be used and select “Completed”.

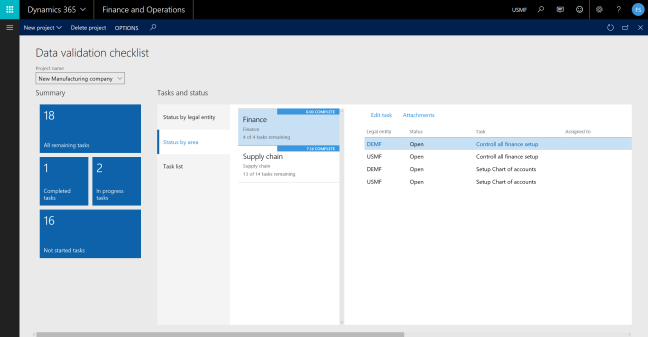
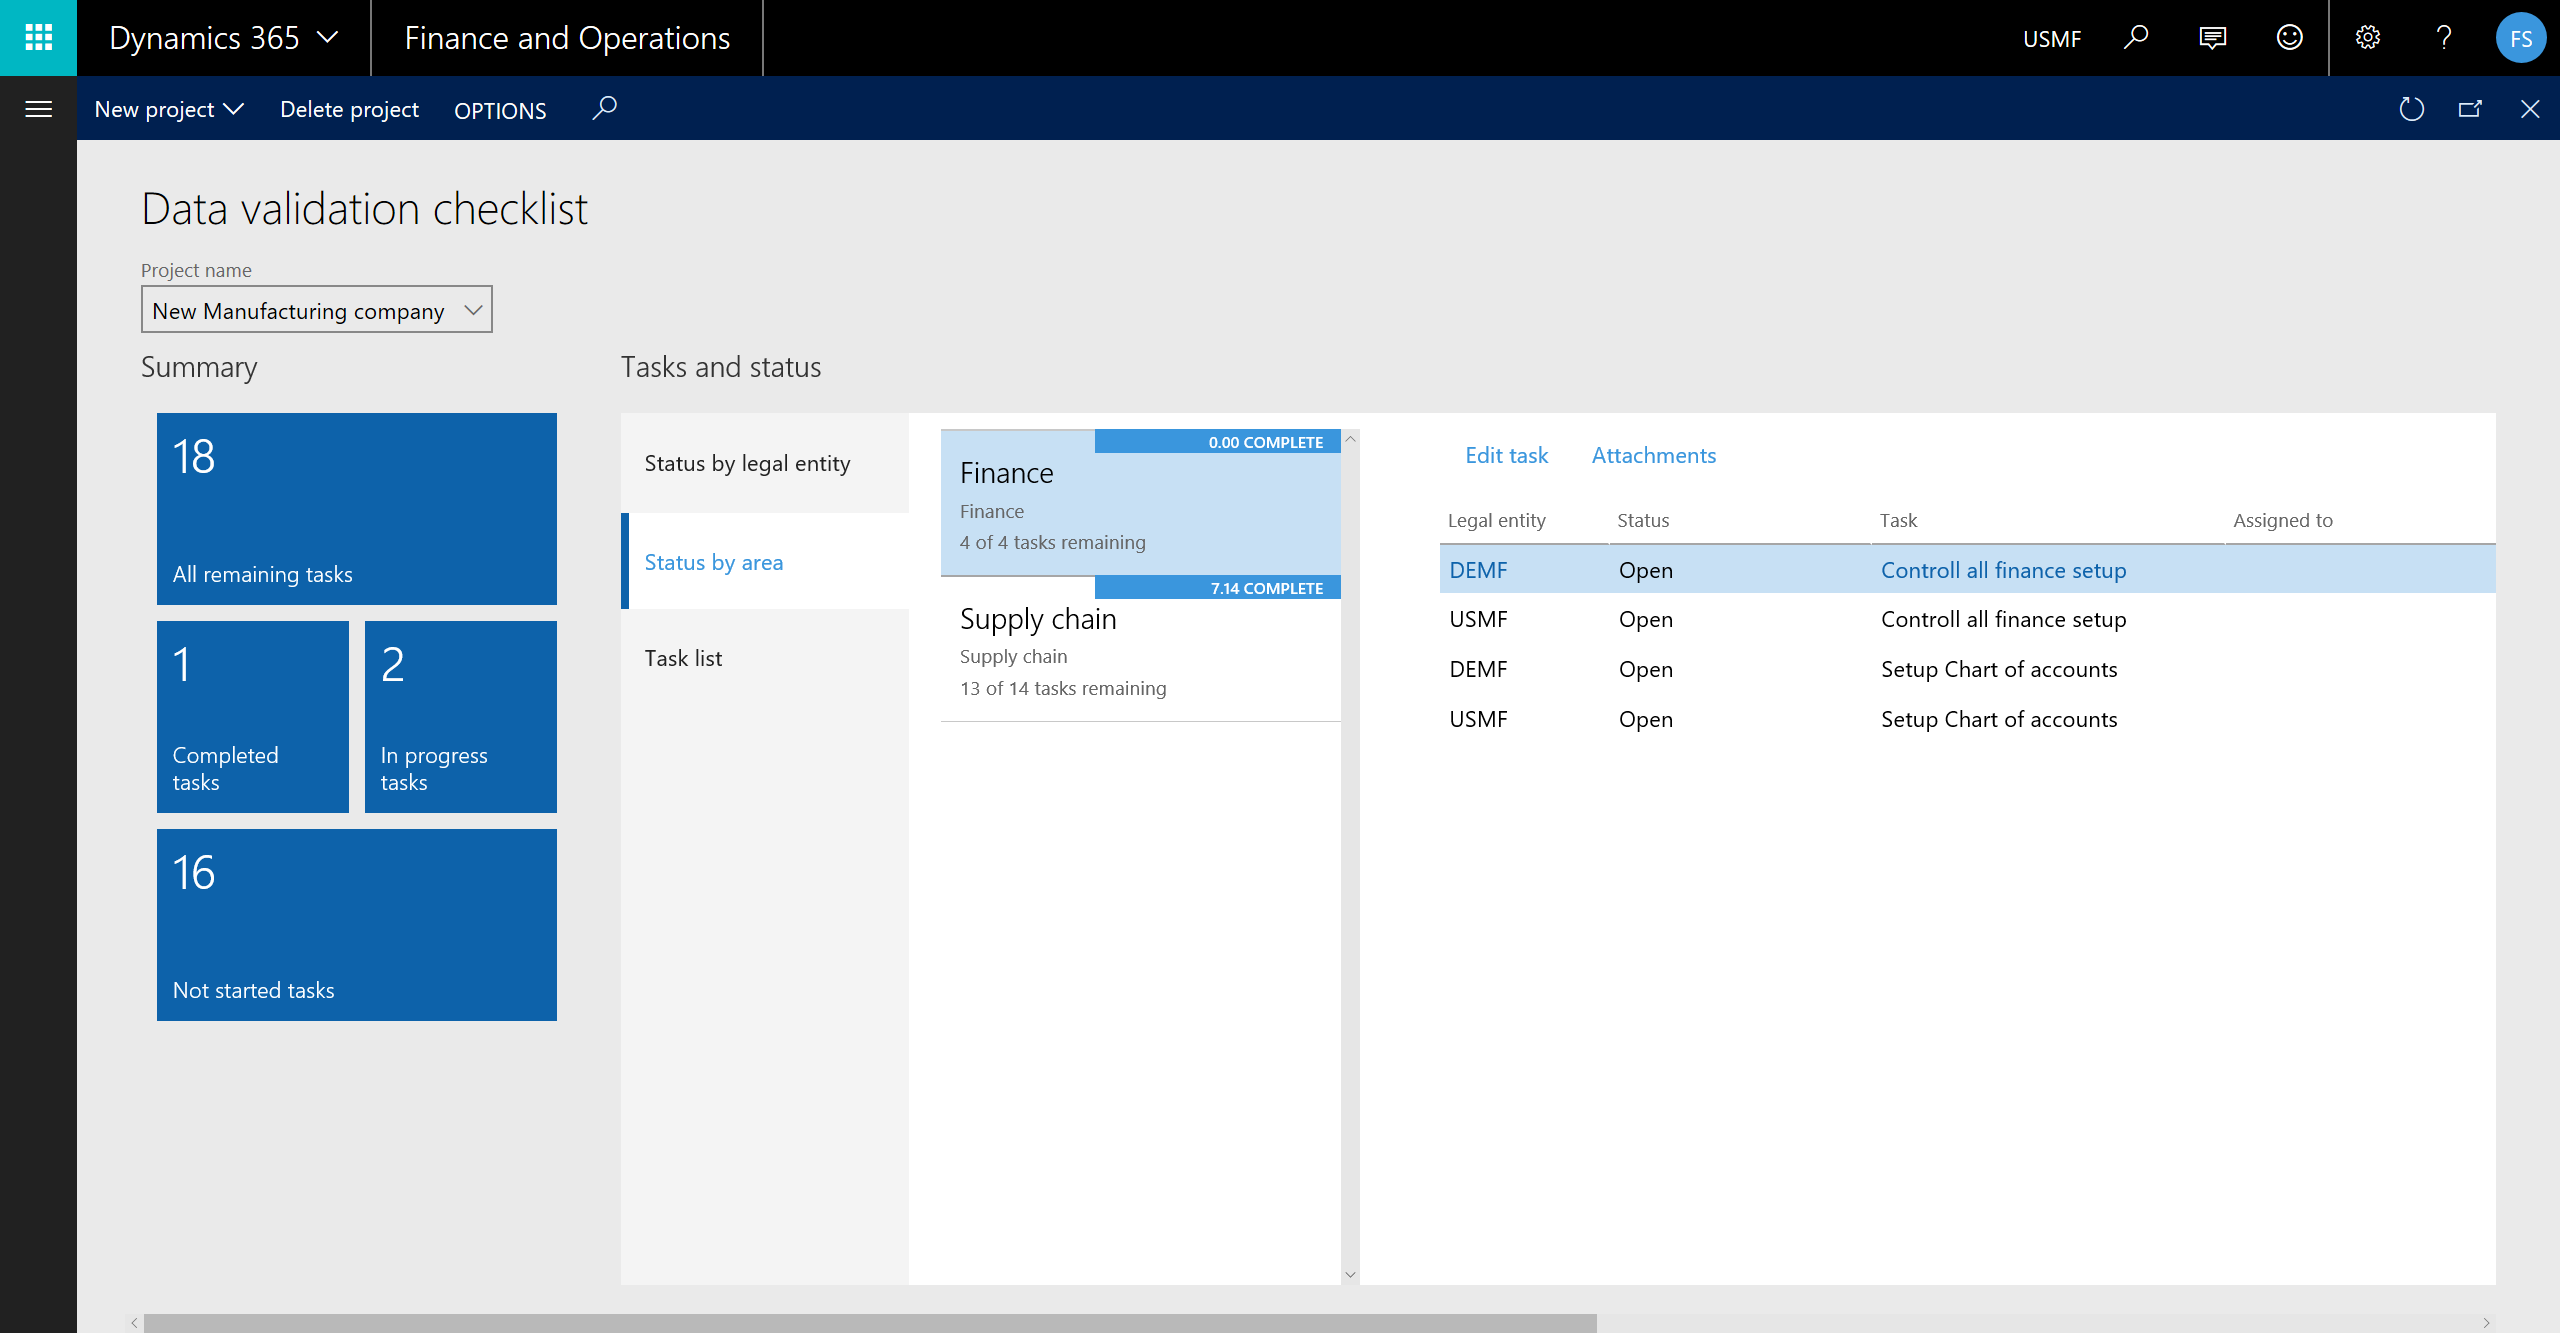
The overview screen will update with the completed and in progress statuses and you’ll have a nice overview of the progression.

DVC_13.png


I think this is an awesome feature that is pretty handy to have on board and I believe that it will be improved slightly over time to be more user friendly.

I’m hoping for a “my tasks” view, but you could of cause create that yourself.

Have a super time setting up that new company!


Is Summit EMEA 2017 worth the trip?

Going to a conference might look like a costly affair with attendance, travel and hotel expenses as well as being away from work with other covering the work load and missed opportunities.

However in n my experience it is what you make of it yourself. Sending someone that is hungry for information and is willing to strike up a conversation with a stranger will give you great benefits from joining a conference like Summit. In fact I would argue that it pays of many times over if you take advantage of the opportunities.

Resources at the conference

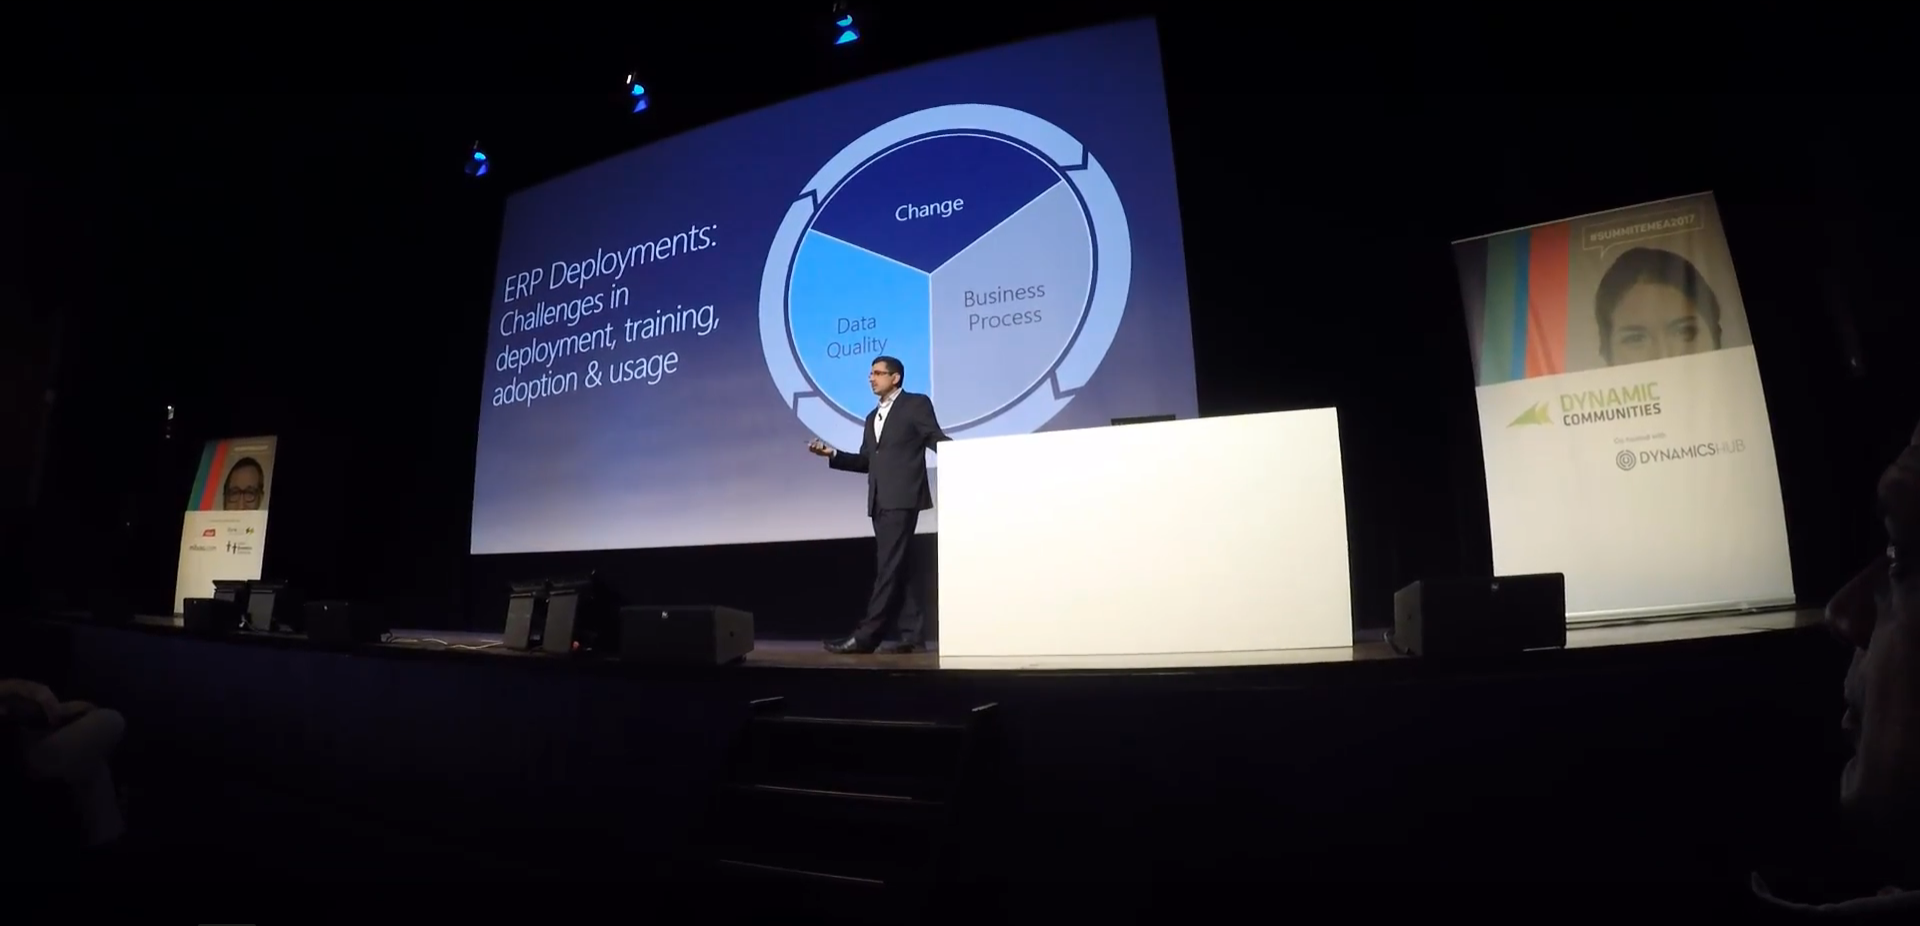
SummitEMEA2017Sri

The many sessions should give you a lot of new information and inspiration to do more. Speakers will most likely have Q&A and hope you will interact with them. They also remain after their sessions so you can ask them one to one or give you their contact information, so you can get in contact with them after the conference. Use them! They want to help.

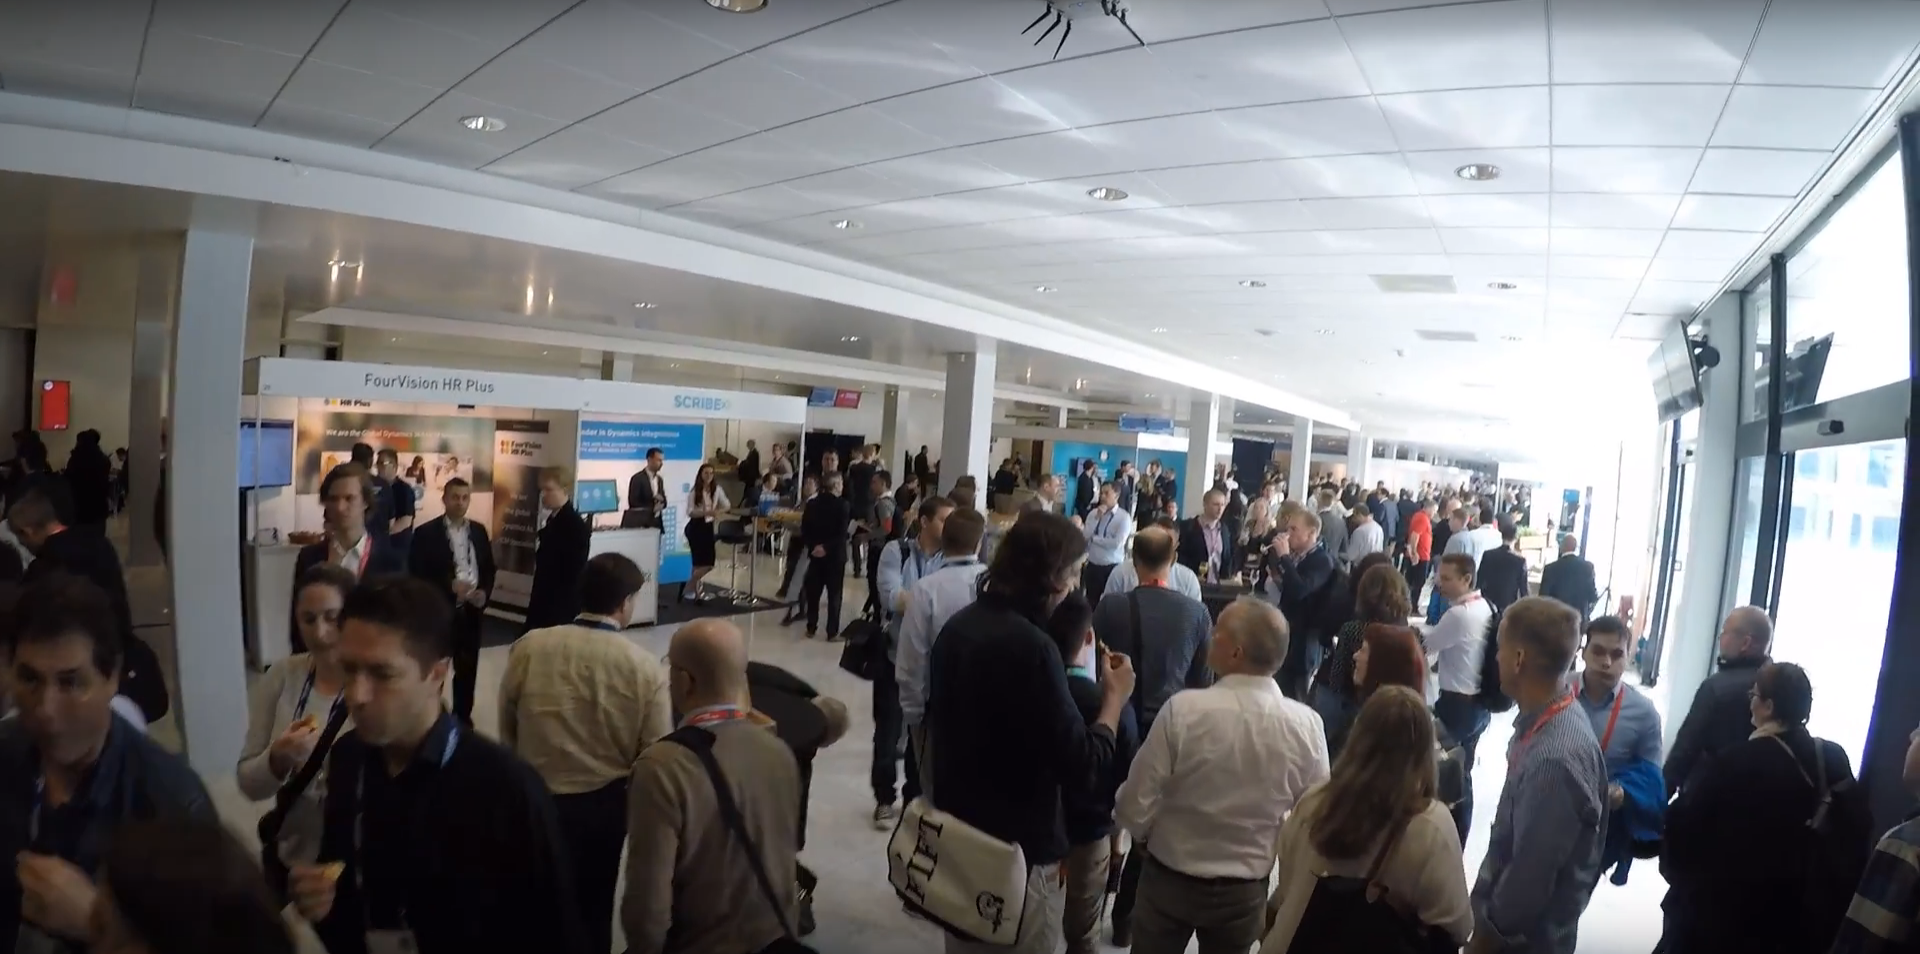
SummitEMEA2017Floor.png

Summit has a bunch of other interaction events like round tables and let’s you hook up with other customers or partners for a talk through their portals or through different chapters. I know that Mike Ehrenberg and the rest of the executives had many sessions with customers to get direct feedback. That is a MAJOR opportunity to directly influence the direction of the product.

SummitEMEA2017MVP
The MVPs at the AXUG Medic station

The MVPs that where stationed at the Medics desk and we didn’t really see that much traffic, but for those who came to have their questions answered got good help. I had a very nice lady that came back day after day, going back to her co-workers each day for more questions that needed answering and returning for a new round.

After a conference day

Many of the implementation partners and most larger ISVs have social events with their customers and other partners. This is a great way to tie closer bonds with them and talk about the products.
I observed one customer get half an hour with one of the Microsoft program managers to get the very best answers to future strategies on warehouse management implementations for the business. That is some great value and probably covered the travel in itself.

SummitEMEA2017Socual.png

Also the bar at the hotel (if you selected one of the hotels suggested by the event) will probably let you get in contact with some other attendees in a social setting.

Bottom line

Use time to join the sessions you find interesting, but also find time to roam the ISV booths. Interact with other attendees, strike up a chat and exchange business cards. Join the user group events and get to know other partners and users by being social and open to meet new people. You’ll get your moneys worth!

Check out my travel experience and some ISV interviews here:

Make a suggestion and get heard!

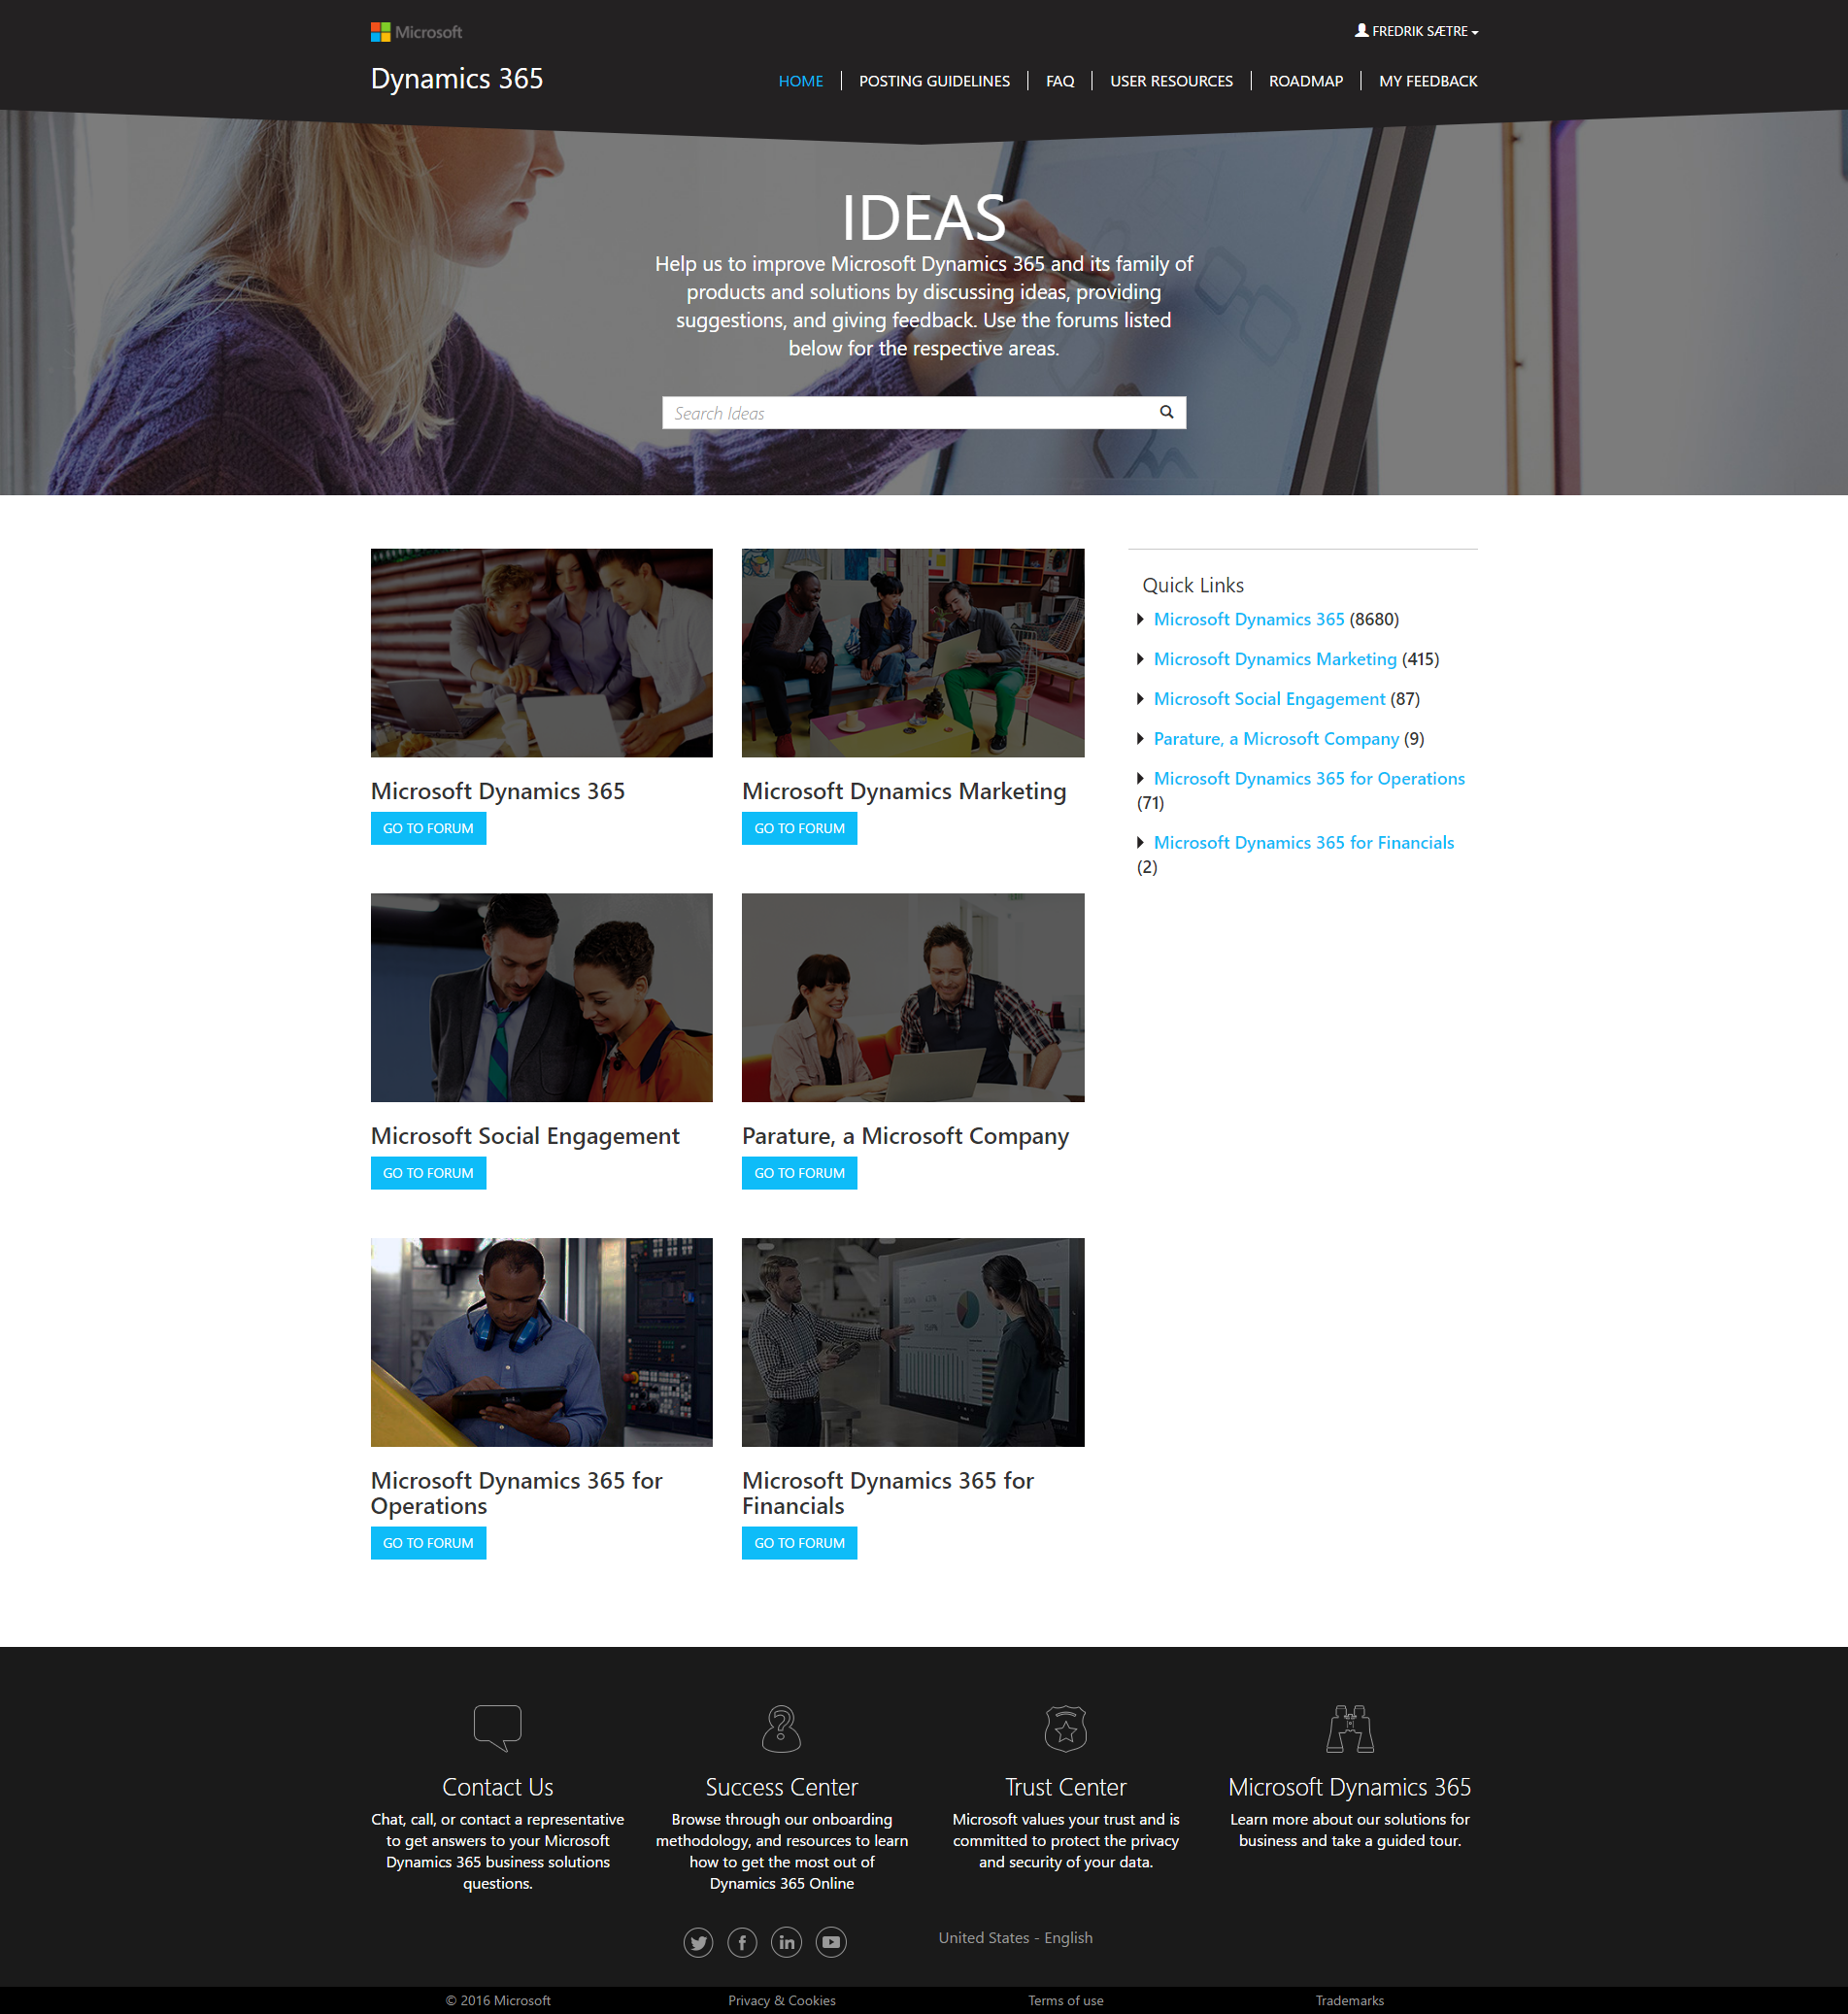
If you have a suggestion for improvement or changes for Dynamics you can go to the new Ideas page and get to know the solution better. You can also go here to browse suggestions and vote them up to get the improvements that are important to YOU up on the agenda. This is a preliminary  work list that actually makes it to the product. So go get your voice heard and make the application move in your direction.

ideas.png

The URL Parameters

The awesomeness of the HTML5 client is apparent, but it might be even clearer if you know a bit on how the URL parameters work as well. These can be used to further enhance your user experience and extend the usage of the web client.

URL parameters are additional commands you can send in the URL and can be used to affect the way the web application works. It is placed at the end of the URL string after the ? (question mark) character and each parameter is separated by an & (and) character.  The parameter can be given an attribute or value and that is separated by the = (equals) character.  Giving you a structure like so:

https://site.domain.com/page.format?parameter1=attribute&parameter2=value...

Let’s dive in!

cmp=[legal entity]

You can set a default company that the user defaults to at User Options > Preferences > Startup > Company. Use this URL parameter to override this and directly access a legal entity. If you use many companies it will be easy to create shortcuts for each company for quick access.
Note: This parameter is visualized by default in the URL.

lng=[language]

You can set a default user language under User Options > Preferences > Language and country/region preferences > Language. However if you like to open the solution in another language, use this URL parameter. Great if you’re doing user training and support, work with different companies in their native languages or if you are doing a demo.

mi=[menuItem]

Use this to go directly to any of the forms in the solution. Based on your user settings you either go to DefaultDashboard, SystemAdministrationWorkspace, EssentialsDashboard or HcmEmployeeSelfServiceWorkspace. This can take you to any for like SalesTable, CustTable and so on…
Note: This parameter is visualized by default in the URL and it is easy to copy it for future use.

hideSplash=true

Want to skip the splash screen? Use that. Looks like it shaves of a millisecond or two, so it isn’t that much faster. It does however look slightly cleaner from my standpoint.

theme=[ThemeID]

theme

The theme ID is the number of the color palette given in the user setup. This is awesome when combined with the “cmp” URL parameter. Gives you a sense of what company you’ve launched, but be aware that you can change company at any time.

limitednav=true

If you’re afraid you might accidentally navigate to a form you shouldn’t be in, you can use the “limitednav” URL parameter to minimize this risk. This parameter takes all navigation possibilities away.

embedded=true

Removes all chrome in the application and just shows the core form in the browser. Great for embedding into other applications.

density={21,30}

Working on both tablet and on a computer? There are two different types of grid density in the solution. High(21) and low(30). Select your pixel density by using this URL parameter. This is the same as selecting a different grid density in the user options.
Example: &density=21 is best suited for desktop and &density=30 is best suited for tablet/touch.

prt=[partitionID]

If you have a solution that is partitioned you can use this to quickly going to the right one. The feature is deprecated, but still works. For instance the Contoso database Public sector partition can be accessed by writing: prt=ps. You can get an overview of the partition by entering f=PartitionAdministration (replacing the mi parameter). Note that partitions have their own user access, so you would initially access it with the system master user. Thanks to Ievgen for pointing this out.

f=[formName]

Some forms doesn’t have menu items. Like “SysTableBrowser” *, “jmgClock”, “WHSWorkExecute” and “jmgWorkPlanner”. These are some forms that are in the system, but isn’t accessible through the menus. This replaces the “mi” parameter.

* Requires also to use the parameter tableName=[TableID]

q=[queryString]

If you activate the “URL manipulation” parameter under your User settings > Preferences, you’ll find that when doing a filter or record lookup you’ll get a query string directly in your URL. I assume that this is the query string that is created by the deep links generator. This is described in the Operations Wiki.
https://ax.help.dynamics.com/en/wiki/how-to-create-and-use-deep-links/

Mode={trial,mobile}

The mode selector does access features that you might otherwise not have access to. The “trial” attribute starts a trial experience and the “mobile” attribute gives the user access to the mobile application builder feature.

debug=develop

This gives you the opportunity to debug the application directly in the web client. It gives you a little indicator right next to the legal entity (company) selector on the top menu bar and clicking it gives you details on the client performance.


That is the list so far. This will give to the opportunity to create direct access to the form and information you need quickly and give a better user experience. I can see great benefit in a multi company solutions.
What URL parameters do you know about that isn’t on this list?

Master planning in Manufacturing

I just got my copy of the new Scott Hamilton book! Look at how happy I am!

It is an in-depth master piece that covers all the functionality from the basics to the advanced. Organized and written in a way that everyone with basic knowledge of the subject matter and ERP can digest it. It covers all the different type of manufacturing scenarios (Discrete, Project, Process and Lean) and has a great deal of case studies that are informative and might even solve many of your known and unknown issues.

This is the go-to book for any company that is using Master planning functionality. If you’re a customer, user or partner of Dynamics AX2012 or Dynamics 365 for Operations, then you should go get this book ASAP. You’ll probably save the cost after the second chapter (As the first is the introduction)…

It will deepen the understanding of the features for people that are already up and running on the system as well as work as a reference guide. And it is a great companion and a must-read to people doing an implementation or want to simply learn the solution.

Go get your copy either physical or electronically now!
https://www.amazon.com/dp/099730717X

Also read some of Scotts latest posts on MSDynamicsWorld.com for more info: